

If you are interested in web3 development, one of the fundamental aspects of developing a web3 app is to establish a connection between the app and a wallet. In fact, chances are this is the initial step to “authenticate” or “login” users without the need of having a database to store their account information.
In this tutorial, you are going to learn how to connect a Web3 React app to a Phantom Wallet. Although it might sound complicated, it is not as hard as it sounds. Also, take into account you don’t have to use React to connect to a Phantom wallet. Once you learn the core concepts, you can use any other JavaScript frontend framework or library to establish a connection to a Phantom wallet.
Table of Contents
What is Phantom?
Phantom is a crypto wallet that enables users to send and receive tokens, collect NFTs, and even allow to connect to a hardware wallet. Phantom developed a browser extension to not only have quick access to your wallet but also enable web3 apps to access JavaScript solana to detect if the Phantom provider is available.
Step-by-Step: Connect a Web3 React App to a Phantom Wallet
This is the workflow of this tutorial: We are going to start by creating our React app. Then, we will detect if the Phantom provider is available. We will create a button to establish a connection to a Phantom wallet. Once we are connected to the account, we will generate another button to disconnect from the wallet.
Pre-requisites
Use Chrome, Brave, Firefox, or Edge Browser
As previously mentioned, Phantom has a browser extension to “turn your browser to a crypto wallet”, just like they say on their site. At the moment of this writing, the Phantom browser extension is available in the following browsers:
- Chrome
- Brave
- Firefox
- Edge
Therefore, make sure to use any of those browsers when testing the application.
Note: this tutorial was tested in chrome
Create a Phantom Wallet
Before we move forward, make sure you have an existing wallet. Feel free to skip this section if you already have an existing wallet you can use to establish a connection. On the other hand, if you don’t have a wallet, make sure to create one.
Install Phantom Browser Extension
Install the phantom browser extension to the browser you want to use:
- Chrome Phantom Browser Extension
- Brave Phantom Browser Extension
- Firefox Phantom Browser Extension
- Edge Phantom Browser Extension
Create a New Wallet
Once the Phantom Browser Extension is installed, you will be redirected to a page to create a new wallet. Click on “Create New Wallet”.

Save Recovery Phrase
After creating your Phantom wallet, you will be given a secret recovery phrase. Save it in a safe place. I recommend using a password manager to save this information.

Once you save it, click on “OK, I saved it somewhere”.
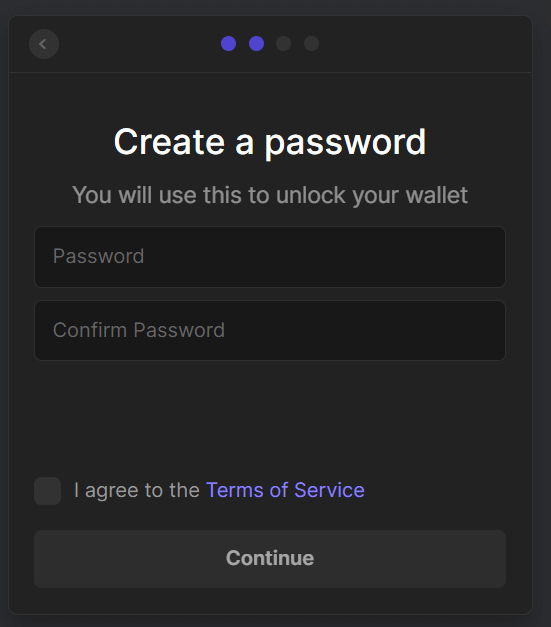
Create a password for your Phantom Wallet
After saving the recovery phrase, it will prompt you to create a password. Go ahead and create your password. Agree to terms of service and click “Continue”.
Once you do this, you can access your Phantom wallet by clicking the browser extension.

Creating the React App using TypeScript
Time to start building the app. First, generate a new react project using Typescript using the following command.
Note: Feel free to name your project to other than web3-connect-phantom-wallet.
npx create-react-app web3-connect-phantom-wallet --template typescriptInstall dependencies
For this tutorial, we need to install @solana/web3.js. Go ahead and add it.
yarn add @solana/web3.jsDetect Phantom Provider Exists
Prior to attempting to connect to a wallet, we need to first detect the existence of the wallet provider, in other words, whoever is providing with software to hold, store, or transfer digital currency. In this case, we are looking to detect if Phantom exists.
Adding PhantomProvider Interface
First, we need to generate TypeScript interfaces to easily identify all the properties of the Phantom provider inside the App.tsx file.
import {
  PublicKey,
  Transaction,
} from "@solana/web3.js";


type DisplayEncoding = "utf8" | "hex";
type PhantomEvent = "disconnect" | "connect" | "accountChanged";
type PhantomRequestMethod =
  | "connect"
  | "disconnect"
  | "signTransaction"
  | "signAllTransactions"
  | "signMessage";

interface ConnectOpts {
  onlyIfTrusted: boolean;
}

interface PhantomProvider {
  publicKey: PublicKey | null;
  isConnected: boolean | null;
  signTransaction: (transaction: Transaction) => Promise<Transaction>;
  signAllTransactions: (transactions: Transaction[]) => Promise<Transaction[]>;
  signMessage: (
    message: Uint8Array | string,
    display?: DisplayEncoding
  ) => Promise<any>;
  connect: (opts?: Partial<ConnectOpts>) => Promise<{ publicKey: PublicKey }>;
  disconnect: () => Promise<void>;
  on: (event: PhantomEvent, handler: (args: any) => void) => void;
  request: (method: PhantomRequestMethod, params: any) => Promise<unknown>;
}
Generate function to get provider
Next, add inside the App component a getProvider variable to store a function that gets a wallet provider.
  /**
   * @description gets Phantom provider, if it exists
   */
  const getProvider = (): PhantomProvider | undefined => {
    if ("solana" in window) {
      // @ts-ignore
      const provider = window.solana as any;
      if (provider.isPhantom) return provider as PhantomProvider;
    }
  };
If you have worked in web development, you will find as a surprise the existence of a solana key property as part of the window object. This doesn’t mean the window.solana property has always existed. What happens is, the Phantom browser extension injects the solana object as a key of the window object to make easy the process of detecting the existence of a wallet provider.
Having said that, if the Phantom browser extension is enabled in the browser, our app will identify the existence of the provider. On the other hand, if you decide to disable the browser extension, the app will not find the Phantom provider.
Store the state of the provider
We are going to store the state of the provider in our app. This will help us determine what to display to the user based on whether the Phantom provider exists or not.
First, import useEffect and useState from react.
import { useEffect, useState } from "react";Then, inside the App component, generate the variables to store and update the state of the provider.
const [provider, setProvider] = useState<PhantomProvider | undefined>(
    undefined
  );
Now, add the following logic below the getProvider variable to set the state of the provider.
// detect phantom provider exists
  useEffect(() => {
    const provider = getProvider();

    if (provider) setProvider(provider);
    else setProvider(undefined);
  }, []);
Notice this code will only execute once the component mounts because we are using an empty array [] as a second argument of the useEffect function. This is important as we don’t want to constantly update the provider every time the app re-renders.
Add logic to display content based on state of the provider
Finally, update the UI based on the state of the provider. If the provider exists, add a button to connect to the Phantom wallet. Otherwise, show a message suggesting the user to install the Phantom Browser extension.
return (
    <div className="App">
      <header className="App-header">
        <h2>Tutorial: Connect to Phantom Wallet</h2>
        {provider && (
          <button
            style={{
              fontSize: "16px",
              padding: "15px",
              fontWeight: "bold",
              borderRadius: "5px",
            }}
          >
            Connect to Phantom Wallet
          </button>
        )}

        {!provider && (
          <p>
            No provider found. Install{" "}
            <a href="https://phantom.app/">Phantom Browser extension</a>
          </p>
        )}

        <p>
          Built by{" "}
          <a
            href="https://twitter.com/arealesramirez"
            target="_blank"
            rel="noreferrer"
            className="twitter-link"
          >
            @arealesramirez
          </a>
        </p>
      </header>
    </div>
Open the App.css to add some styling to the links and buttons we added.
a {
  color: white;
}
.twitter-link {
  color: "white";
  font-size: "16px";
  margin-top: "15px";
  margin-bottom: "15px";
}
Test the logic
That was quite a bit of explanation, which hopefully will make sense once we start running our app.
yarn startNotice how the “Connect to Phantom Wallet” button is displayed whenever the Phantom browser extension is available.

Now, go ahead and disable the Phantom browser extension from your browser. Then, refresh the page. You should see a message prompting the user to install the browser extension.

Once proving the logic works, enable Phantom browser extension one more time.
Connect to Phantom Wallet
We have a “Connect to Phantom Wallet” button that doesn’t do anything as of now. Let’s create a function to trigger once the user clicks the button.
First, generate a walletKey to store the public key of the connected account.
const [walletKey, setWalletKey] = useState<PhantomProvider | undefined>(
    undefined
  );
Then, add a connectWallet variable storing the function that makes the request to connect to the wallet below getProvider.
/**
   * @description prompts user to connect wallet if it exists
   */
  const connectWallet = async () => {
    // @ts-ignore
    const { solana } = window;

    if (solana) {
      try {
        const response = await solana.connect();
        console.log('wallet account ', response.publicKey.toString());
        setWalletKey(response.publicKey.toString());
      } catch (err) {
       // { code: 4001, message: 'User rejected the request.' }
      }
    }
  };
Finally, wire up the button to trigger connectWallet once the button is clicked.
<button
            style={{
              fontSize: "16px",
              padding: "15px",
              fontWeight: "bold",
              borderRadius: "5px",
            }}
            onClick={connectWallet}
          >
            Connect to Phantom Wallet
          </button>
Test the logic by going back to the browser and clicking on the “Connect to Phantom Wallet” button. You should see a Phantom browser extension prompting you to whether connect the app.

This is a mechanism to ensure we are trusting to connect our account with any site. Click on “Connect”. This will add our app as part of the list of trusted apps.
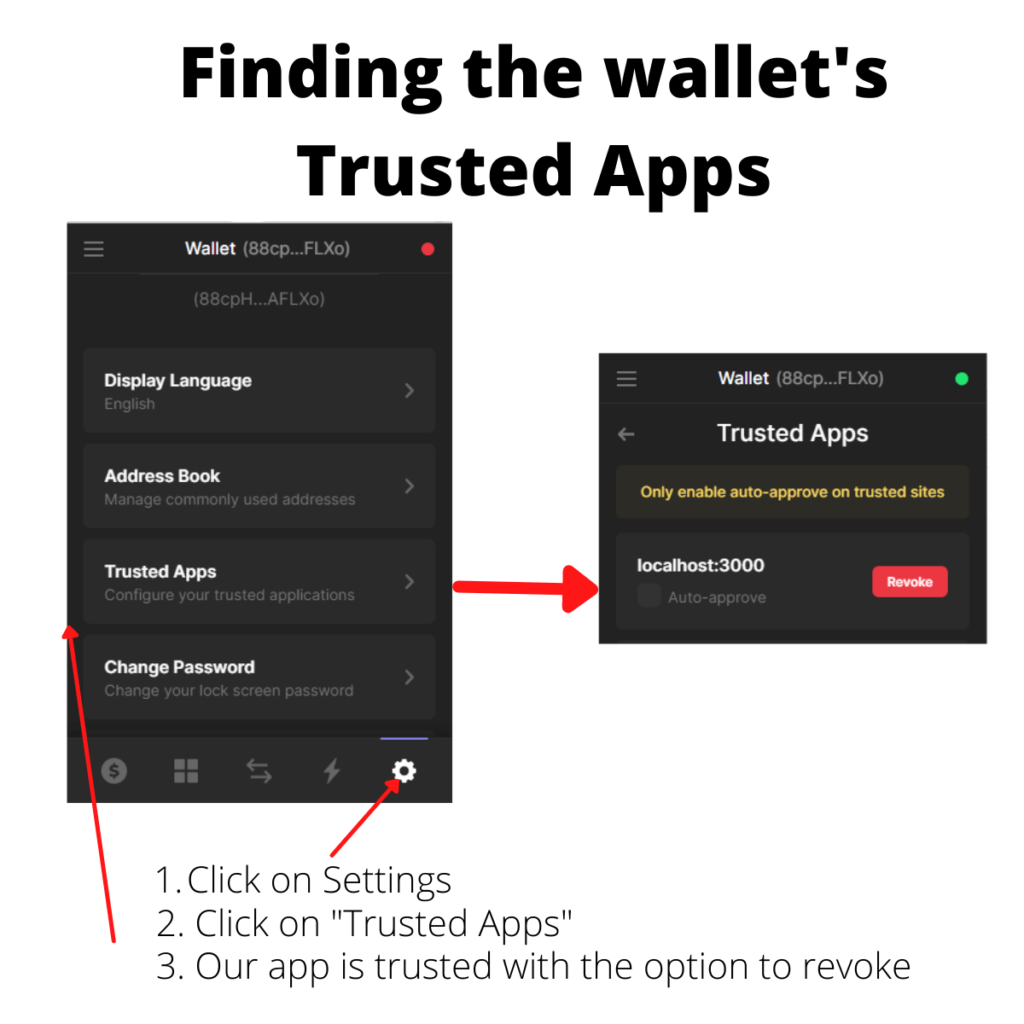
Finding the list of trusted apps in the Phantom wallet
You can always verify the list of trusted apps in our Phantom wallet. To find them,
- Click on the Phantom browser extension
- Click on the Settings icon
- Click on the “Trusted Apps” option
- Verify our app is trusted by verifying the address, which is localhost:3000 since we are currently developing in our local environment.
Display Account and Hide “Connect to Wallet” button
Once the account is connected, it is not necessary to have available the “Connect to Phantom Wallet” button. Hence, we are going to check if the walletKey does not exist. If so, do not display the button. Also, add a check to verify the walletKey exists to display the account to the user.
{provider && !walletKey && (
          <button
            style={{
              fontSize: "16px",
              padding: "15px",
              fontWeight: "bold",
              borderRadius: "5px",
            }}
            onClick={connectWallet}
          >
            Connect to Phantom Wallet
          </button>
        )}

        {provider && walletKey && <p>Connected account {walletKey}</p>}
Refresh the app and verify the account is displayed once you connect to the wallet, and check the “Connect to wallet” button is no longer enabled.
Add button to disconnect from the Phantom Wallet
Just like when you log in to a traditional app, you want to have the option to log out. In this case, we want to connect and disconnect to a digital wallet.
To allow users to disconnect the wallet, use the disconnect() function provided by Solana. To do this, we are going to create a disconnectWallet variable and assign the following function.
/**
   * @description disconnect Phantom wallet
   */
  const disconnectWallet = async () => {
    // @ts-ignore
    const { solana } = window;

    if (walletKey && solana) {
      await (solana as PhantomProvider).disconnect();
      setWalletKey(undefined);
    }
  };
Add a disconnect button which will trigger the disconnectWallet function.
{provider && walletKey && (
          <div>
            <p>Connected account {walletKey}</p>

            <button
              style={{
                fontSize: "16px",
                padding: "15px",
                fontWeight: "bold",
                borderRadius: "5px",
                margin: "15px auto",
              }}
              onClick={disconnectWallet}
            >
              Disconnect
            </button>
          </div>
        )}
Go to your browser and verify the account is not available after you click the “Disconnect” button.
Final Code
If for any reason something wasn’t working as expected and you are stuck trying to figure out what is going, feel free to compare it with the final code.
import { useEffect, useState } from "react";
import { PublicKey, Transaction } from "@solana/web3.js";

import "./App.css";

type DisplayEncoding = "utf8" | "hex";
type PhantomEvent = "disconnect" | "connect" | "accountChanged";
type PhantomRequestMethod =
  | "connect"
  | "disconnect"
  | "signTransaction"
  | "signAllTransactions"
  | "signMessage";

interface ConnectOpts {
  onlyIfTrusted: boolean;
}

interface PhantomProvider {
  publicKey: PublicKey | null;
  isConnected: boolean | null;
  signTransaction: (transaction: Transaction) => Promise<Transaction>;
  signAllTransactions: (transactions: Transaction[]) => Promise<Transaction[]>;
  signMessage: (
    message: Uint8Array | string,
    display?: DisplayEncoding
  ) => Promise<any>;
  connect: (opts?: Partial<ConnectOpts>) => Promise<{ publicKey: PublicKey }>;
  disconnect: () => Promise<void>;
  on: (event: PhantomEvent, handler: (args: any) => void) => void;
  request: (method: PhantomRequestMethod, params: any) => Promise<unknown>;
}

function App() {
  const [provider, setProvider] = useState<PhantomProvider | undefined>(
    undefined
  );
  const [walletKey, setWalletKey] = useState<PhantomProvider | undefined>(
    undefined
  );

  /**
   * @description gets Phantom provider, if it exists
   */
  const getProvider = (): PhantomProvider | undefined => {
    if ("solana" in window) {
      // @ts-ignore
      const provider = window.solana as any;
      if (provider.isPhantom) return provider as PhantomProvider;
    }
  };

  /**
   * @description prompts user to connect wallet if it exists
   */
  const connectWallet = async () => {
    // @ts-ignore
    const { solana } = window;

    if (solana) {
      try {
        const response = await solana.connect();
        console.log("wallet account ", response.publicKey.toString());
        setWalletKey(response.publicKey.toString());
      } catch (err) {
        // { code: 4001, message: 'User rejected the request.' }
      }
    }
  };

  /**
   * @description disconnect Phantom wallet
   */
  const disconnectWallet = async () => {
    // @ts-ignore
    const { solana } = window;

    if (walletKey && solana) {
      await (solana as PhantomProvider).disconnect();
      setWalletKey(undefined);
    }
  };

  // detect phantom provider exists
  useEffect(() => {
    const provider = getProvider();

    if (provider) setProvider(provider);
    else setProvider(undefined);
  }, []);

  return (
    <div className="App">
      <header className="App-header">
        <h2>Tutorial: Connect to Phantom Wallet</h2>
        {provider && !walletKey && (
          <button
            style={{
              fontSize: "16px",
              padding: "15px",
              fontWeight: "bold",
              borderRadius: "5px",
            }}
            onClick={connectWallet}
          >
            Connect to Phantom Wallet
          </button>
        )}

        {provider && walletKey && (
          <div>
            <p>Connected account {walletKey}</p>

            <button
              style={{
                fontSize: "16px",
                padding: "15px",
                fontWeight: "bold",
                borderRadius: "5px",
                margin: "15px auto",
              }}
              onClick={disconnectWallet}
            >
              Disconnect
            </button>
          </div>
        )}

        {!provider && (
          <p>
            No provider found. Install{" "}
            <a href="https://phantom.app/">Phantom Browser extension</a>
          </p>
        )}

        <p>
          Built by{" "}
          <a
            href="https://twitter.com/arealesramirez"
            target="_blank"
            rel="noreferrer"
            className="twitter-link"
          >
            @arealesramirez
          </a>
        </p>
      </header>
    </div>
  );
}

export default App;
Conclusion
This tutorial explained how to connect to the Phantom wallet using the Phantom browser extension in a React app. However, after understanding how to connect and disconnect the wallet, you can use other frontend frameworks as all that you need is to have access to the solana object injected by the Phantom browser extension.
Did you like this article?
Share your thoughts by replying on Twitter of Become A Better Programmer or to my personal Twitter account.