
It is common for software developers to multitask and constantly shift their focus to working on something different. An example of this looks like this: someone started working on a “feature” branch, but all of a sudden changed to the “master” branch after discovering a bug in production. Having code changes in the “feature” branch, and changing to the “master” branch can be messy. Fortunately, there is a solution for this: git stash.
Git stash is a powerful tool to stash or secretly save changes made on any tracked files without the need to commit them, which allows retrieving those changes at any point in time regardless of the current branch in use.
Learning another command means adding more to the list of things developers need to remember. Fortunately, git stash is not complex to learn. In this article, you are going to learn everything you need to know about git stash: how to create, list, apply, drop, and remove stashed changes.
Table of Contents
How to use Git Stash: Creating a Stash
To create a stash, use the git stash command once you know there are unfinished changes you don’t want to commit. For the purposes of demonstrating how to use git stash, we are going to look at the following example where initially there are no changes in index.html and styles.css files.

At any point, we decide to add an index.css file as well as make changes to the index.html.

Hence, if we verify the status of the current branch with git status, git will say which files are untracked and which files are staged and unstaged.
$ git status
On branch master
Your branch is up to date with 'origin/master'.

Changes not staged for commit:
  (use "git add <file>..." to update what will be committed)
  (use "git restore <file>..." to discard changes in working directory)
        modified:   index.html

Untracked files:
  (use "git add <file>..." to include in what will be committed)
        index.css

no changes added to commit (use "git add" and/or "git commit -a")
If for any reason we need to stash the following changes, use the stash command.
$ git stashRunning the stash command will only stash changes made to the index.html file, and revert it back to the way it initially was as if no changes were made.

However, the index.css file was not stashed. Otherwise, we should have seen our repository in the way we initially had it without any changes. The reason is git stash will only stash modified tracked files. Hence, index.html and styles.css are tracked files, and index.css is untracked unless it is staged.
If we stage the index.css, the index.css file becomes a tracked file in git. Once staged, we can stash any changes made to the index.css file. To see this, stage the index.css file using the add command.
$ git add index.cssThen, verify index.css was actually staged.
$ git status
On branch master
Your branch is up to date with 'origin/master'.

Changes to be committed:
  (use "git restore --staged <file>..." to unstage)
        new file:   index.css

Changes not staged for commit:
  (use "git add <file>..." to update what will be committed)
  (use "git restore <file>..." to discard changes in working directory)
        modified:   index.html
We verify index.css file is staged by seeing if there is a message displayed below “Changes to be committed:” text.
Since the index.css file was successfully staged, now we can stash it.
$ git stashNotice how the index.css file “disappears” from the root folder of the repository, which means it has correctly stashed.

List Git Stashes
To see the list of git stashes, add the list option after the stash command.
$ git stash listThe terminal will display all of the stashed changes made in the repository.

Every time you stash changes, git tracks the stashes in a stack.

Therefore, the latest stash is moved to the top of the stack which is identified with the index 0 (stash@{0}). Storing the stashes in a stack plays a key role when using other functionality when using apply and pop options to retrieve a stash.
Apply Stashed Changes
Learning how to stash changes wouldn’t be complete if there is no way to apply stashed changes. To apply stashed changes, use the option apply to use the last stash (stash@{0}) in the stack of git stashes.
$ git stash applyIf the latest stashed changes we had were for adding an index.css file and making changes to the index.html file, those changes will be readded.

Applying a specific stash version
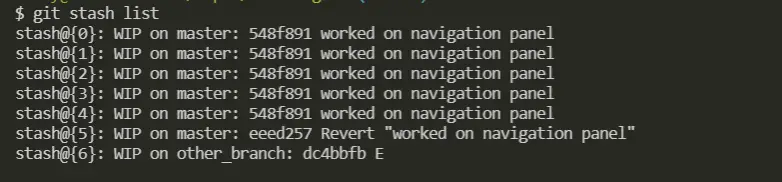
It is possible to apply a specific stash version. For instance, if after executing git stash list , there is a list of git stashes like this:
And you need to apply the stash that says: stash@{6}: WIP on master: eeed257 Revert "worked on navigation panel", add the stash index number after using the apply command. Therefore, use the following command to apply stash@{6}:
$ git stash apply "stash@{6}"Applying a stash using pop option
It is possible to apply stashed changes using the pop option. Similar to using apply option without defining a specific stash version, it will apply the last stash in stack or stash@{0}.
$ git stash popDifference Between Pop and Apply Git Stashes
The difference between git stash apply and git stash pop is apply option only applies the stash while the pop option applies the stash but also removes the stash from the stack.

git stash apply vs git stash popNotice how we previously had 8 git stashes, but after using git stash pop, we have now 7 git stashes.
Applying and removing a specific stash version
To use pop on a specific stash version in a similar way it is used when using the apply option. Make sure to provide the specific stash version. The following example is the command used If we want to apply and delete the stash: stash@{5}: WIP on master: eeed257 Revert "worked on navigation panel":
$ git stash pop "stash@{5}"Notice how the stash WIP on master: eeed257 Revert "worked on navigation panel is removed after checking the list of git stashes using git stash list.

git stash pop "stash@{5}"Removing Git Stashes
Sometimes developers keep adding git stashes and applying them later on using the apply option without necessarily removing them. To remove a git stash, use the drop option. When using the drop option without specifying the stashed version, it will remove the last git stash (stash@{0}).
$ git stash dropTo remove a specific stash version, provide the stash version when using the drop option.
$ git stash drop "stash@{3}"Git stash drop option differs from pop option as it does not apply the stashed changes.
Removing All Git Stashes
In case of wanting to remove all git stashes, it is possible to use them over and over git stash drop until all stashes are deleted. However, to remove them all at the same time use the clear option.
$ git stash clearName and Retrieve Git Stashes by Name
Adding a name to a git stash
Now that you understand how to create, apply, and remove git stashes, we are going to cover how to add stash with a name. If you noticed in the previous examples, git generates automatically a name or a message per each stash added. Sometimes these generated messages are the same when adding multiple stashes, which makes it hard to identify the stashed changes.
Notice how the message: "worked on navigation panel is removed" is used five of the six stashes in the previous image. To better identify a git stash, add a custom name or message by using the option -m followed by the message when creating a stash.
$ git stash -m removing_stylesWe can quickly verify the message was added to the stash by listing the git stashes using the git stash list command.

Retrieve a git stash by name
Using Regex
One way to retrieve and apply a stash based on a given name is using regex when using apply.
$ git stash apply stash^{/removing_styles}Using stash index
Another approach if you are not familiar with using regex is to display the list of git stashes and find out the index of the stash with the custom name.

Once we find the stash with the custom name, in this case stash@{2}: On master: removing_styles, we can now apply the stash based on the version.
$ git stash apply stash@{2}Conclusion
All in all, git stash is a useful tool every software developer should include as part of their git knowledge to quickly save changes without the need of committing them in case of needing to switch branches or attempting other logic.
It is possible to provide custom and more meaningful names to git stashes to easily identify git stashes whenever someone needs to verify the list of available stashes.
Interested in Learning more about Git?
I wrote other articles explaining how to use other git commands, and I thought you might be interested in reading some of them since you are reading this.
- The Complete Guide to Git Alias: Shorcuts to Be Efficient
- How to Rebase in Git: Explained Step-by-Step
- How to Revert the Last Commit Locally and Remote in Git
- What is Git HEAD? A Practical Guide Explained with Examples
- Learn How to Use Version Control with Git and GitHub: The Absolute Guide for Beginners
- How to Update GitHub Personal Access Tokens?
Did you like this article?
Share your thoughts by replying on Twitter of Become A Better Programmer or to personal my Twitter account.