
If you are relatively new to Rust, you probably have gone through a decent learning curve to understand the programming language concepts. Working with hardcoded data in your projects is not common when working on real-world application, but rather making HTTP requests to fetch data from other APIs. After all, do you know how to make an HTTP request in Rust?
Here are the steps to make an HTTP request in Request in Rust using Reqwest:
- Create a project (optional)
- Add Reqwest and Tokio dependencies
- Define the function to make an HTTP request using reqwest
- Configure request accordingly such as passing additional headers (optional)
- Deserialize HTTP response as JSON
In this article, you will learn how to make an HTTP request in Rust using Reqwest. Don’t worry if you haven’t used Reqwest before. This article will explain how to use it as we go through this tutorial. Fortunately, Reqwest makes it simple to make HTTP requests.
Table of Contents
Steps to Make an HTTP request in Rust
1. Create a project (optional)
This step is optional if you are working off of an existing project. However, if you are rather starting from scratch, you will need to create a new project prior you add the code to make an HTTP request in Rust.
Note: This project uses cargo CLI which is installed when installing Rust. If you haven’t installed Rust in your local machine, follow the instructions to install Rust mentioned here before you continue following this tutorial.
Rust makes it easy to create a new project using the cargo new command. To use it, open your terminal in the directory where you want to create your Rust project and execute the cargo new <name_of_the_project> command. For this article, you can call the project rust-make-http-request. Hence, the command will look like this.
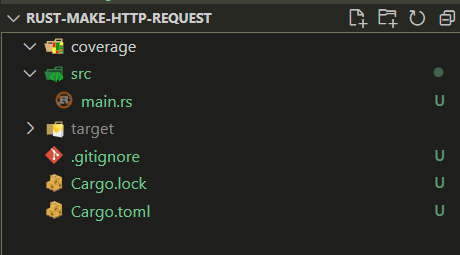
cargo new rust-make-http-requestThis will generate a new folder called rust-make-http-request with a basic folder structure containing files such as cargo.toml and the main.rs.
cargo new rust-make-http-request command2. Add Reqwest and Tokio Dependencies
Rust projects use the cargo.toml file to define the project’s metadata such as the name and version. Also, it serves as the package manager. In other words, the cargo.toml file contains the lists of dependencies, called “crates”, that a Rust project uses. If you started a Rust project from scratch, most likely you won’t have any listed dependencies.
Since you are going to make an HTTP request using the Reqwest crate, or dependency, we need to add it as part of the [dependencies] listed in the cargo.toml file as well as the Tokio, a crate that allows running asynchronous applications with Rust. Hence, add the following dependencies under [dependencies] section.
[dependencies]
reqwest = { version = "0.11", features = ["json"] }
tokio = { version = "1", features = ["full"] }
Note: Once you save the changes to the cargo.toml file, cargo will automatically download the dependencies and update the cargo.lock file.
3. Define the function to make an HTTP request using Reqwest
For this tutorial, you will use the Cat Fact Ninja API to make a GET request to fetch a random fact about cats. The API endpoint you are going to use is https://catfact.ninjafact/fact.
Open the main.rs file. By default, it should have generated a main() function using a println! macro to log “Hello, world!“. Replace that with the following code.
#[tokio::main]
async fn main() {
    let fact = get_cat_fact().await;

    println!("fact = {:#?}", fact);
}

async fn get_cat_fact() -> Result<String, Box<dyn std::error::Error>> {
    let client = reqwest::Client::new();
    let body = client.get("https://catfact.ninja/fact").send()
        .await?
        .text()
        .await?;

    Ok(body)
}
Code explanation
If you have experience working with other programming languages and making HTTP requests, you might have a general idea of what is going on. However, I’ll walk you through the code explaining step-by-step.
Using tokio:main attribute
The first part to take a look at is the main() function.
#[tokio::main]
async fn main() {
    let fact = get_cat_fact().await;

    println!("fact = {:#?}", fact);
}
The main function calls the get_cat_fact() function to make a request to the Cat Fact Ninja API. Then, it logs the result in the terminal. Notice the usage of the await after-calling the get_cat_fact() function. This allows to wait until the asynchronous function finishes its process prior to moving on to the next line of code.
To use await inside a function, the function must be an async function.
#[tokio::main]
async fn main() {}
Otherwise, you will get the following error:error[E0728]: await is only allowed inside async functions and blocks .
Why does the main function use the tokio::main attribute?
If you attempt to make the main() function async without using the tokio::main attribute, you will get the following error: error[E0752]: main function is not allowed to be async .
As shared in the documentation, tokio::main “marks async function to be executed by the selected runtime.” Hence, using the tokio::main attribute allows the main function to use the async keyword.
Making the request to an API
In theget_cat_fact function, you make a request to the Cat Fact Ninja API. More specifically, to the GET facts endpoint, or https://catfact.ninja/fact.
async fn get_cat_fact() -> Result<String, Box<dyn std::error::Error>> {
    let client = reqwest::Client::new();
    let body = client.get("https://catfact.ninja/fact").send()
        .await?
        .text()
        .await?;

    Ok(body)
}
First, create the client variable that holds the Client to make requests.
Then, you use the client.get method to make a GET request. In case you need to make a different type of request, such as a POST request, the client has available other convenient methods to make the requests:
- To make a
GETrequest, useclient.get() - To make a
POSTrequest, useclient.post() - To make a
PUTrequest, useclient.put() - To make a
PATCHrequest, useclient.patch() - To make a
DELETErequest, useclient.delete() - To make a
HEADrequest, useclient.head()
These convenience methods are a wrapper of using the client.request method with a specific request type, for instance, if you inspect the definition of the client.getmethod,
    /// Convenience method to make a `GET` request to a URL.
    ///
    /// # Errors
    ///
    /// This method fails whenever the supplied `Url` cannot be parsed.
    pub fn get<U: IntoUrl>(&self, url: U) -> RequestBuilder {
        self.request(Method::GET, url)
    }
you will find it automatically passes Method::GET as a parameter of the client.request method.
The request is sent once you trigger thesend() method, returning a future Response. That’s why, it is inmmediately followed by an await ,
client.get("https://catfact.ninja/fact").send()
        .await?
which waits until there is a response from the external API.
Finally, the text() method gets the response as a text. The text() method is an asynchronous operation. Hence, use await right after to extract the response data before moving on to the next line of code:
let body = client.get("https://catfact.ninja/fact").send()
        .await?
        .text()
        .await?;
Run the code to test it works
Execute the cargo run command to test the code works.
If everything works as intended, you should see a cat fact logged in the terminal, similar to the screenshot below:

cargo run command4. Configure request accordingly such as passing additional headers (optional)
Depending on the API endpoint to trigger, you will need to configure you request accordingly. In this case, triggering the GET request to fetch a cat fact from the Cat Fact Ninja API didn’t require special configuration such as passing a JWT in the header, defining the request content type, or passing cookies in the header.
To pass headers in the request, use the header() method right after defining the request type (get() , post() , put(), etc).
use reqwest::header::{AUTHORIZATION, CONTENT_TYPE};

let body = client
        .get("https://catfact.ninja/fact")
        .header(CONTENT_TYPE, "application/json")
        .header(AUTHORIZATION, "Bearer {MY_JWT}")
        .send()
        .await?
        .text()
        .await?;
Notice the previous example chains a set of header() methods in case of changing multiple header configurations needs. Also, the Reqwest library has a key of the different header keys you can import such as AUTHORIZATION or CONTENT_TYPE.
Note: The previous snippet of code is an example of how to pass headers additional headers to the request. It is not necessary to make these changes to the code used in this tutorial.
5. Deserialize HTTP response as JSON
By now you know how to make a request and get the response as a text. However, it is uncommon to get a text response to consume or use the data to perform additional processes.
Typically, the response data comes as JSON. Then, it is converted to an object structure that a programming language can store the data, which makes easier to manipulate the data in a given programming language, and Rust isn’t the exception.
Add Serde dependency
To deserialize the HTTP response as JSON, you will need serde dependency in your project.
Open the cargo.toml file. Then, add serde in the dependencies section:
[dependencies]
reqwest = { version = "0.11", features = ["json"] }
tokio = { version = "1", features = ["full"] }
serde = { version = "1.0", features = ["derive"] }
Save the cargo.toml file once you add the serde dependency.
Define response struct
Open the main.rs file and generate the struct containing the data structure of the API response. This article uses the Cat Fact Ninja API GET endpoint, which returns a response data with the following object structure:
{
   "fact": "Smuggling a cat out of ancient Egypt was punishable by death. Phoenician traders eventually succeeded in smuggling felines, which they sold to rich people in Athens and other important cities.",
   "length": 192
}
Since the response contains the keys fact and length , you will need to create a struct with the fields fact and length and types String and i32 respectively.
struct CatFact {
    fact: String,
    length: i32,
}
Apply Deserialize derive macro
Import the derive macro use serde::{Deserialize}; , and write #[derive(Deserialize)] on CatFact struct. This will look like this:
use  serde::{Deserialize};

#[derive(Deserialize, Debug)]
struct CatFact {
    fact: String,
    length: i32,
}
Note: The Debug macro, which you see in the previous snippet of code, allows to log the struct value using the println! macro rule. In this tutorial, you use the println! macro to log the request’s response.
println!("fact = {:#?}", fact);Failing to use the Debug macro results in errors during compilation. If you opt to not use the Debug macro, remove the println! statement to prevent errors.
Use the json() method to deserialize the response body as JSON
Go to the get_cat_fact function. Then, update the code that implements the text() method and use .json::<CatFact>() instead.
let body = client
        .get("https://catfact.ninja/fact")
        .send()
        .await?
        .json::<CatFact>()
        .await?;
The json::<T>() method attempts to deserialize the response as JSON, where T is CatFact.
Note: the json::<T>() will fail if the T passed doesn’t match the JSON response. That means, if the response has the keys fact,length, and, for instance, id , the deserialization process will fail as the CatFact struct doesn’t have the id field. The json::()could also fail if the field type doesn’t match a key value of the JSON object like the following example:
#[derive(Deserialize, Debug)]
struct CatFact {
    fact: String,
    length: String,  // this will cause an error as the "length" key in the JSON response is not a String
}
Update the function’s result type
Initially, the get_cat_fact() function returned the result type:
Result<String, Box<dyn std::error::Error>>Since you no longer use the text() to get the response body as a text, the get_cat_fact() function doesn’t return a String.
Instead, it returns the Catfact struct. Therefore, update the get_cat_fact() to contain the correct result type.
async fn get_cat_fact() -> Result<CatFact, Box<dyn std::error::Error>> {
  // the rest of the code
}
Run the code to test it works
Once you have made all the changes, check your code looks similar to the following:
use  serde::{Deserialize, Debug};

#[derive(Deserialize, Debug)]
struct CatFact {
    fact: String,
    length: i32,
}

#[tokio::main]
async fn main() {
    let fact = get_cat_fact().await;

    println!("fact = {:#?}", fact);
}

async fn get_cat_fact() -> Result<CatFact, Box<dyn std::error::Error>> {
    let client = reqwest::Client::new();

    let body = client
        .get("https://catfact.ninja/fact")
        .send()
        .await?
        .json::<CatFact>()
        .await?;

    Ok(body)
}
If your code is correct, run the cargo run command. You should see additional a CatFact struct shape-like log in the terminal.

Understanding Deserialization JSON errors
As mentioned in the previous step, the request::json<T>() method could fail if the struct T doesn’t match the response’s body JSON structure. However, the code doesn’t have a friendly way to let you know the shape of T doesn’t match (I know this from experience and it can be a real-time waster).
To demonstrate that an error happens when T is not an exact match, you will create a new DifferentCatFact struct containing all the fields from CatFact and an id field.
#[derive(Deserialize, Debug)]
struct DifferentCatFact {
    fact: String,
    length: i32,
    id: String,
}
Copy the get_cat_fact() function and paste it below. Update the name of the copied function to get_different_cat_fact() function and update the T instances from CatFact to DifferentCatFact . Your code should look like this:
async fn get_different_cat_fact() -> Result<DifferentCatFact, Box<dyn std::error::Error>> {
    let client = reqwest::Client::new();

    let body = client
        .get("https://catfact.ninja/fact")
        .send()
        .await?
        .json::<DifferentCatFact>()
        .await?;

    Ok(body)
}
In the main() function, add a new variable called different_cat_fact that stores the response from calling the get_different_cat_fact() function. Then, log the value returned using the println! macro.
#[tokio::main]
async fn main() {
    let fact = get_cat_fact().await;

    println!("fact = {:#?}", fact);

    // The code below will panic when not using the Debug macro as the code
    // fails to deserialize the response as JSON from the GET Cat Fact Ninja
    // API endpoint using struct DifferentCatFact as this struct doesn't match
    // the JSON structure of the response.
    let different_cat_fact = get_different_cat_fact().await;

    println!("different cat fact = {:#?}", different_cat_fact);
}
If you attempt to run the code using cargo run , you will see a reqwest::Error in the output of your terminal.

Conclusion
In this tutorial, you learned how to make a HTTP request to another API using the Reqwest crate in Rust. Also, you learned how to extract the body response in two ways:
- Get the response as text
- Attempt to deserialize the response as JSON
If you run into any issues, feel free to compare your code with the code of this article https://github.com/arealesramirez/rust-how-to-make-an-http-request
Was this article helpful?
Let us know your comments by replying on Twitter of Become A Better Programmer.