
Have you ever wondered how the front end and the back end work together to form a complete full-stack application? You probably have heard the term API(Application Programming Interface). It is a mechanism with a functional role that facilitates the communication between the front end and the back end in a web application. API is the interface that makes the communication between the software components like the server, database, and client possible.
In this in-depth article, you will learn how to build a CRUD API with Node.js and MongoDB using the Express framework.
Table of Contents
What is a CRUD API?
CRUD is the abbreviation for Create, Read, Update and Delete. These are the four primary operations performed in databases.
- Create(C): The operation adds new entries in the database table or collection.
- Read(R): The operation reads the data from the database and returns it based on search parameters.
- Update(U): The operation modifies the existing entry in the database.
- Delete(D): The operation removes an entry from the database table or collection.
Therefore, CRUD API refers to the API that performs these various operations. It can create, read, update and delete records in the database using the following HTTP methods.
- GET: It reads the data from the server.
- POST: It creates new resources in the server.
- PUT: It updates the data in the server. It takes parameters to identify the specific data item. It updates the whole content of the specific document.
- DELETE: It deletes the data in the server. It also takes the parameter in the request to identify the item as in the PUT method.
How to Build a CRUD API with Node.js and MongoDB
The article will walk you through the steps of creating a CRUD API using the Node.js Express framework. At the end of the article, you will create a Task Management App that lets you create, view, modify and remove the tasks.
Create the Project
If you don’t have Node installed on your computer, you can download it from the Node.js website. The npm package manager comes with the installation of Node.js, which will be used to install the packages and dependencies while creating the CRUD API. You can view the npm version installed in your system with the following command.
$ npm -v
8.6.0
Now, you are ready to go. Let’s start the project by creating a directory task-management-app. Don’t hesitate to name your directory as your wish.
The first step in the project is to create the soul of your project, the package.json file. Ensure you are inside the project directory and type the following command in the terminal.
npm init -yThe above command creates a file named package.json that is responsible for running the scripts and installing the dependencies in your project. The y flag used in the command indicates to use the default values instead of asking the questions. The initial package.json file looks like this:
//package.json
{
  "name": "task-management-app",
  "version": "1.0.0",
  "description": "",
  "main": "index.js",
  "scripts": {
    "test": "echo \"Error: no test specified\" && exit 1"
  },
  "keywords": [],
  "author": "",
  "license": "ISC"
}
Install the Packages and Tools
The next step is to install the dependencies to your project. As stated earlier, you will be using npm to install the dependencies. Use the following command to install the dependencies to your project.
npm i express mongoose dotenv
npm i -D nodemon- express: It is a Node.js framework for creating a web application’s server and back-end architecture.
- mongoose: It is a Node.js library for modeling the Object Data for MongoDB. In simpler terms, mongoose enables the application to communicate with the MongoDB database.
- dotenv: It is a package that loads the environment variables to the application from the
.envfile. - nodemon: It is a tool that enables the express server to restart automatically after changes have been detected in the code. Notice, the use of the
-Dflag while installing it. The flag indicates thatnodemonis a development dependency, meaning it only works in the development environment.
After the installation of the dependencies, the package.json file looks like this:
//package.json
{
  "name": "task-management-app",
  "version": "1.0.0",
  "description": "",
  "main": "index.js",
  "scripts": {
    "test": "echo \"Error: no test specified\" && exit 1"
  },
  "keywords": [],
  "author": "",
  "license": "ISC",
  "dependencies": {
    "dotenv": "^16.0.1",
    "express": "^4.18.1",
    "mongoose": "^6.4.4"
  },
  "devDependencies": {
    "nodemon": "^2.0.19"
  }
}
To test the API endpoints, you need to install one more tool in your system, Postman.
Creating the Express Web Server
Create a file server.js in the root project directory. In server.js, require the express library, which is the backbone of your application.
Next, require the dotenv library and invoke the config() method. Consequently, it enables you to read the environment variables stored in the .env file with the process.env global variable. Then, create your Express application in an app variable as follows.
//server.js
const express = require('express')
const dotenv = require('dotenv').config()
const app = express()
Create a file .env in the project directory and write the following.
//.env
PORT=8000
Now, you can access the PORT environment variable and listen on that port as follows in server.js.
//server.js
const port = process.env.PORT
app.listen(port, () => console.log(`app running on port ${port}))
Here, the listen() method creates a web server, and your application is live on the local server. However, you need to add a little tweak to run your server with the nodemon tool. For that, add the following line in the scripts key in the package.json file.
//package.json
 "scripts": {
    "server": "nodemon server.js"
  },
The wait is over. You can run your application with the command npm run server. Now you don’t need to restart your server every time you make changes in your code asnodemon will take care of it for you.
As you will be working with JSON and urlencoded data while using Postman, you need some tool to parse these kinds of requests. The good news is Express has built-in middlewares for these purposes and just needs to include these lines in the server.js file.
//server.js
app.use(express.json())
app.use(express.urlencoded({extend:false}))
The final server.js file looks like this:
//server.js
const express = require('express')
const dotenv = require('dotenv').config()
const port = process.env.PORT

const app = express()
app.use(express.json())
app.use(express.urlencoded({extend:false}))

app.listen(port, ()=>console.log(`app running on port ${port}))
Creating Routes
Now that the Express server is up and running, it’s time to create the routes in your application. Routing allows you to handle the HTTP requests by assigning the requests to the specific handler called controllers. Since you are creating a CRUD application, the routes will handle the four HTTP methods stated earlier in the article.
First, create a file named taskRoutes.js and add the following line of codes to the file.
//taskRoutes.js
const express = require("express");
const router = express.Router();

const {getTasks, setTask, updateTask, deleteTask} = require('./taskControllers.js')

router.get('/', getTasks)
router.post('/', setTask)
router.put('/:id', updateTask)
router.delete('/:id', deleteTask)

module.exports = router
The router object handles the different requests to your application. When the server receives a GET request the Express get() method passes the control to the getTasks controller. Likewise, the controllers setTask, updateTask, and deleteTask will handle the POST, PUT and DELETE requests, respectively.
While updating and deleting a data item, you need to specify the item in the route with some identification. Therefore, the /:id parameter is used in the put() and delete() methods.
Now that the creation of routes has been completed, it is necessary to export the router object. Also, add the following line to require the router in server.js.
//server.js
app.use('/tasks', require('./taskRoutes'))
The /tasks route is appended to the port (const port = process.env.PORT) of the web server. For instance, the URL of the GET route will be http://localhost:8000/tasks/.
Note: As of now, the routes won’t work as the controllers used in the taskRoutes.js have not yet been created. For now, require them from a file tasksController.js which we will create later on.
Connecting the Application to the Database
You need a database to store, retrieve and manage the data for your application. You will be using MongoDB for this purpose. You can still download MongoDB locally in your system. Since the article is based on MongoDB Atlas, I recommend using Atlas.
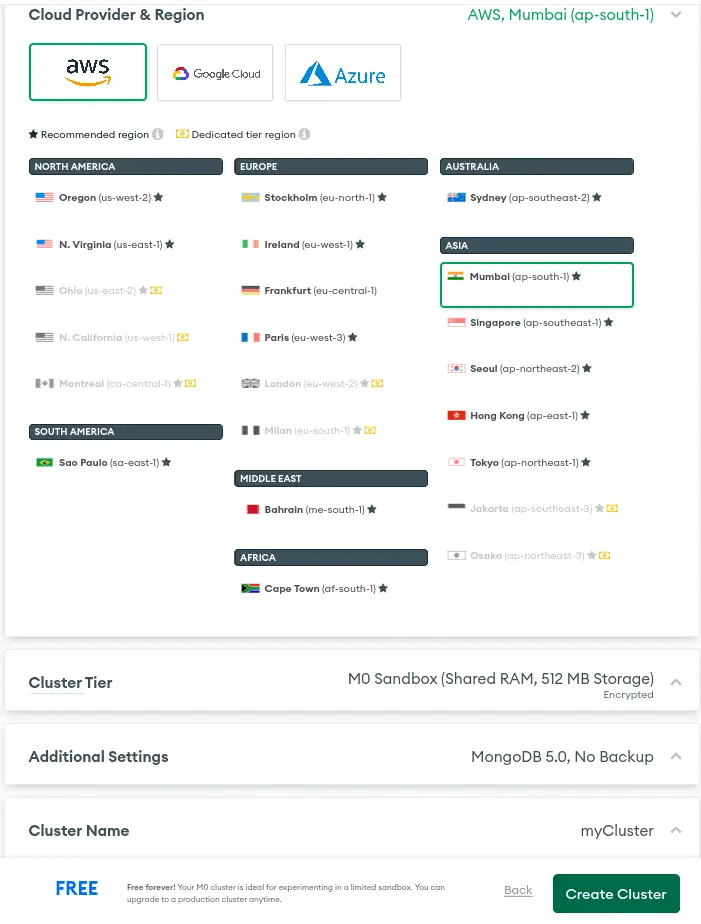
Creating a Cluster
Sign in to MongoDB Atlas, a cloud database service you will use for your application. Or, if you have not created an account yet, create the account.
Next, choose the shared Shared plan, which is free. Then, fill in the relevant information in the picture below and create the cluster.
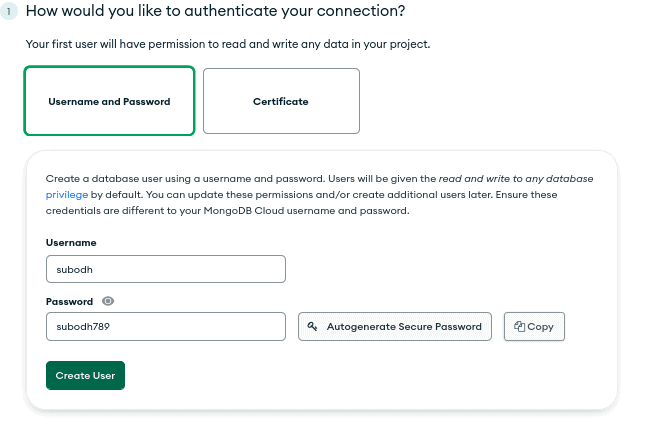
Creating Database Account
Create a database user account with a username and password.
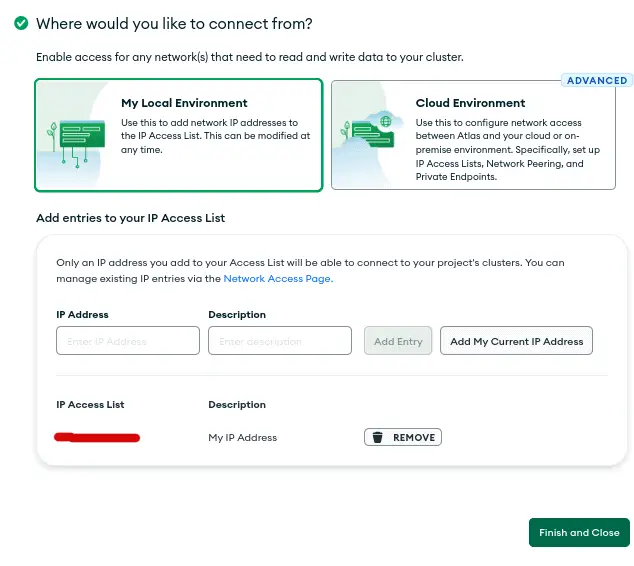
Adding IP Address to Access List
After that, choose My Local Environment and add your IP address to the Access List. Then, click the button Finish and Close.
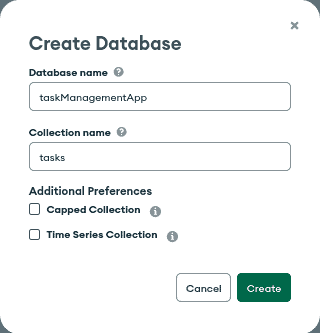
Creating a Collection
A collection in a NoSQL database like MongoDB is equivalent to the table in a relational database like SQL. After creating the cluster, navigate to the Collections tab and click Add My Own Data to create your collection. Fill in the information about your collection as follows.
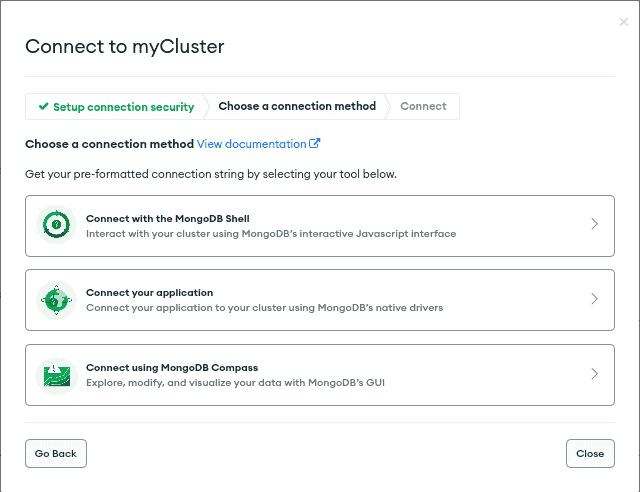
Connecting the Application to the Database
Navigate to the Overview tab and click on Connect. Next, click on the second option, Connect your application.
Then, select the driver and its version as in the picture below. A connection string will appear. After copying the connection string, click the Close button.
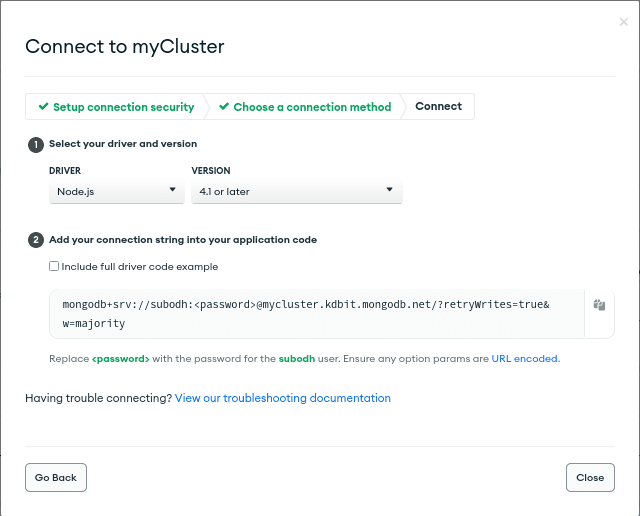
Open the .env file in your project and paste the connection string, which is similar to the following
//.env
MONGO_URI=mongodb+srv://subodh:[email protected]/taskManagementApp?retryWrites=true&w=majority
Note: Do not forget to replace <password> with your database password, and make sure to add the database name in the URI. Here, the name of the database is taskManagementApp.
Setting the Database Connection
In the project directory, create a file db.js and use the connect() method of the mongoose library to establish a database connection to the application.
//db.js
const mongoose = require('mongoose')

const connectDB = async ()=>{
    try{
        const con = await mongoose.connect(process.env.MONGO_URI)

        console.log(`Database Connection successfully established: ${con.connection.host}`)
    } catch(error){
      console.log(error)
    }
}

module.exports = connectDB
The connect() method takes the connection string as the parameter which is stored in the .env file in the MONGO_URI variable. The code snippet above shows the variable is accessed with the process.env global variable.
After importing the connectDB function, require it in the server.js file and invoke the function.
//server.js
const express = require('express')
const dotenv = require('dotenv').config()
const port = process.env.PORT

const connectDB = require('./db')

connectDB()

const app = express()

app.use(express.json())
app.use(express.urlencoded({extend:false}))

app.use('/tasks', require('./taskRoutes'))

app.listen(port, ()=>console.log(`app running on port ${port}`))
Next, restart the server as the .env file has been changed. The output in the terminal looks like this.
> [email protected] server
> nodemon server.js

[nodemon] 2.0.19
[nodemon] to restart at any time, enter `rs`
[nodemon] watching path(s): *.*
[nodemon] watching extensions: js,mjs,json
[nodemon] starting `node server.js`
app running on port 8000
Database Connection successfully established: mycluster-shard-00-01.kdbit.mongodb.net
It shows that the application is connected with the MongoDB database.
Creating Model
The model is the interface between the MongoDB database and the application’s business logic. You can define the data you want to store by creating a model. Additionally, the model is responsible for establishing the relationship between different objects in your application. For now, you will create a model for tasks.
Create a file taskModel.js in the root directory of the project. Inside the file, create a schemataskSchema as follows.
//taskModel.js
const mongoose = require('mongoose');

const taskSchema = mongoose.Schema(
    {
        task:{
            type:String,
            required:[true, 'Please add a task'],
        }
    }, {
        timestamps: true
    }
)

module.exports = mongoose.model('Task', taskSchema)
Here, taskSchema defines the construct and content of your document. There are two contents in the schema, which are task and timestamps. At the end of the file, the schema is imported as Task using the mongoose model property.
Creating Controllers
The controller acts as an interface between the data and the presentation layers. In other words, the controller receives the data from the model, performs operations, and passes it to the presentation model. It queries data from the model and sends the data as a response in the JSON format.
Earlier, you required a controller taskControllers.js while creating taskRoutes.js and used four controllers in the routes:getTasks, setTask, updateTask and deleteTask. Now, you will create the exact file and create the function controllers.
First, create the file taskControllers.js in the root directory.
Then, you need to require the taskModel to fetch the data from the database.
//taskController.js

const Task = require('./taskModel')
Now it’s time to create the controllers for the CRUD operations.
CREATE
The mongoose create() function allows you to add new items to the database.
//taskControllers.js
const setTask = (req, res)=>{
    Task.create({
        task: req.body.task,
    }).then(task=>{
        res.status(200).json(task)
    })
    .catch(err=>{
        res.json(err)
    })
}
In the above code snippet, req.body.task will request the form data from the user. You can supply the data asapplication/x-www-form-urlencoded content type from Postman.
After creating a new data item, the document is returned as a response. If the creation fails, an error is returned.
READ
The mongoose find() function returns specific data from the database according to the query.
//taskControllers.js
const getTasks = (req, res)=>{
    Task.find()
    .then(tasks=>{
        res.json(tasks)
    })
    .catch(err=>{
        res.json(err)
    })
}
Since the find() function has no arguments in the code above, it returns all the data items from the database. In case of failure, an error is returned.
UPDATE
The findByIdAndUpdate() method searches the particular data item and replaces it with the new value.
//tasksController.js
const updateTask = (req, res)=>{
    Task.findByIdAndUpdate(req.params.id, req.body, {
        new:true,
    })
    .then(updatedTask=>{
        res.json(updatedTask)
    })
    .catch(err=>{
        res.json(err)
    })
}
The above code finds the task with the id supplied as a parameter in the request. Then, the new task obtained from req.body replaces the old task. If everything goes right, it returns the updated task. Otherwise, an error will be sent as a response.
DELETE
The findByIdAndDelete() function finds the record through its id and deletes it from the database.
//tasksController.js
const deleteTask = (req, res)=>{
    Task.findByIdAndDelete(req.params.id)
    .then(task=>{
        res.json(task)
    })
    .catch(err=>{
        res.json(err)
    })
}
Here, the task with the specific id is deleted, and the document is returned as a response. An error is returned as a response if it fails to delete the document.
After creating the controllers, do not forget to export the controllers at the end of the tasksController.js.
//taskController.js
module.exports = { setTask, getTasks, updateTask, deleteTask}
Sending Request to API Endpoints
Now that the CRUD API has been created, it is time to test the API by sending HTTP requests to the endpoints. You will be using Postman for testing the API. The table below shows the API endpoints.
| Methods | URLs | Descriptions |
|---|---|---|
| GET | /tasks/ | Display all the tasks |
| POST | /tasks/ | Create a new task |
| PUT | /tasks/id | Update the existing task |
| DELETE | /tasks/id | Delete the existing task |
Sending POST Request
In Postman, open a new tab, enter http://localhost:8000/tasks/ in the URL bar and select POST from the drop-down menu. Next, click on the Body option right below the URL bar. Then, chose the x-www-form-urlencoded and write task for the key and my first task for value options. After that, click on the Send button.
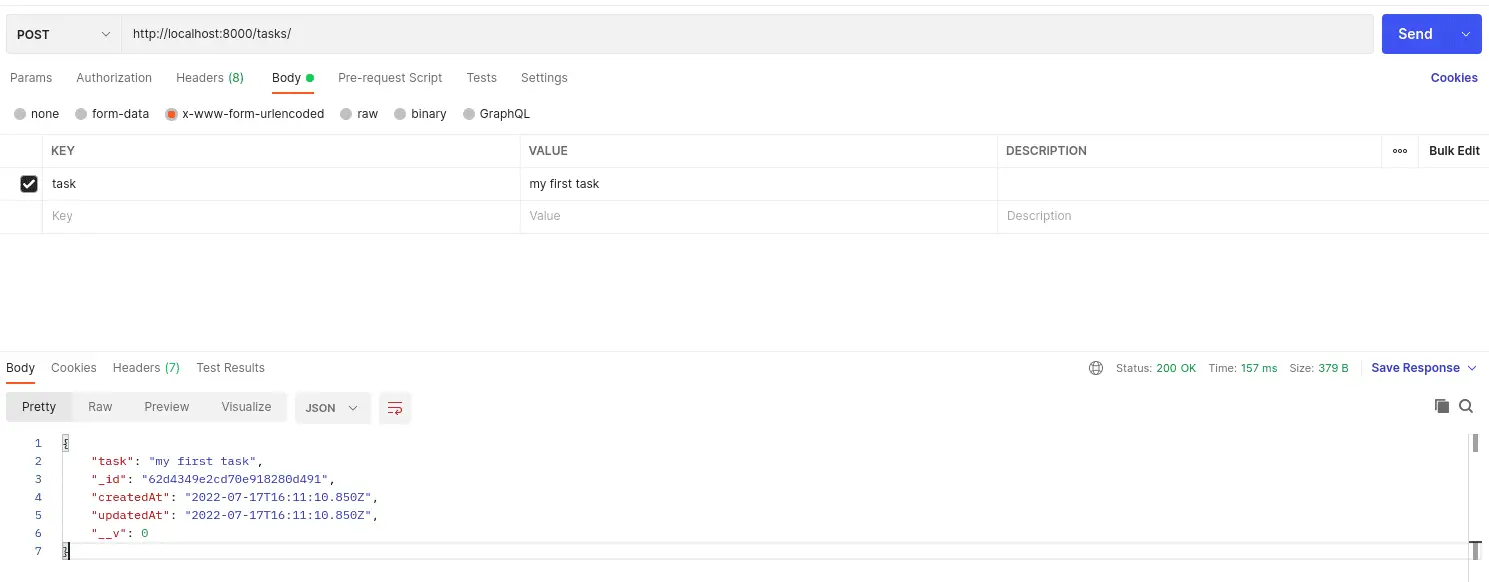
You just sent a POST request to the server with some payload. After the request is received, a new document is created in the database and sent as a response. Again, send another POST request as follows:
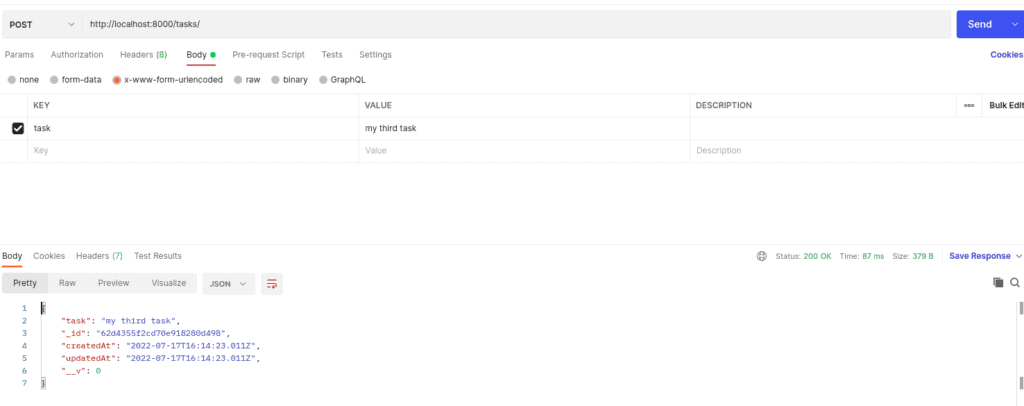
Notice that task has the value my third task.
Sending GET Request
You have created two documents and can send the GET request to the server to read those documents from the database. Write the URL http://localhost:8000/tasks/ and send the GET request.
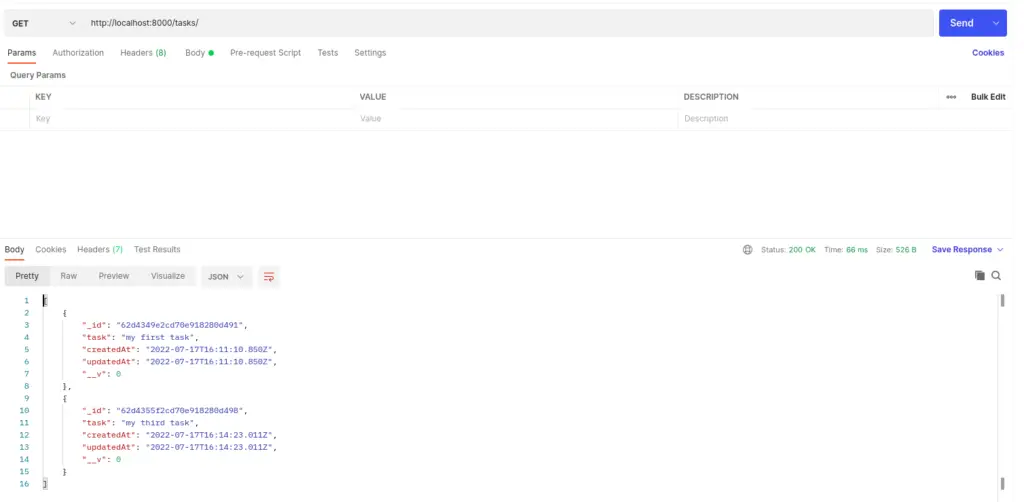
In response, both documents are returned from the database.
Sending PUT Request
Remember, you created a task that says my third task. Suppose that it was a mistake. With a PUT request, you can change it to my second task. For that, grab the id of my third task and write the URL as http://localhost:8000/tasks/<id> where <id> is the id of the task. In my case, the url is: http://localhost:8000/tasks/62d4355f2cd70e918280d498.
Choose PUT from the drop-down menu. Next, write the value to be updated, as shown in the picture below.
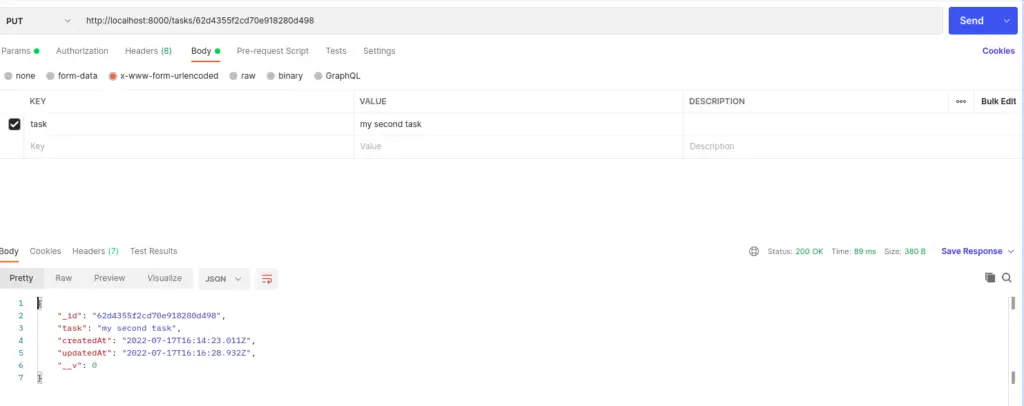
The document is updated in the database, and the response returns the updated document.
Sending DELETE Request
The URL structure of the DELETE request is similar to the PUT request. It should have the id of the document which is to be deleted.
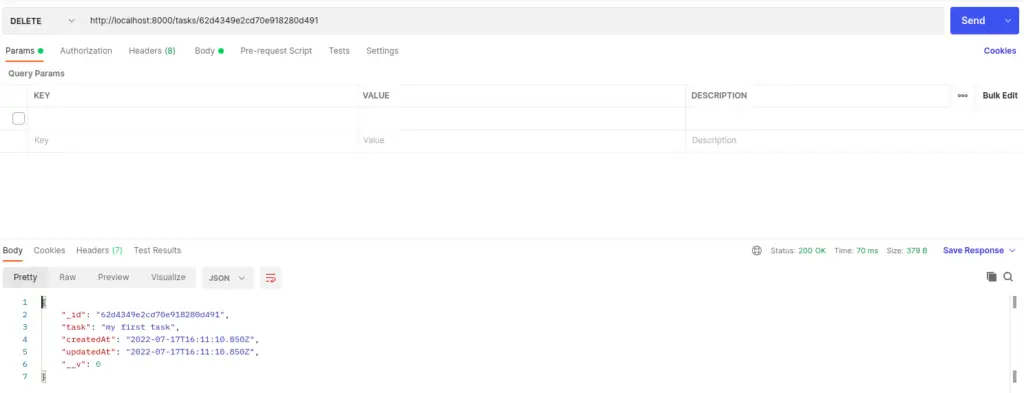
As a response, the deleted document is returned. However, the data is deleted from the database.
Conclusion
Congratulations! You created a task management CRUD API on top of the Express framework using Node.js and MongoDB. This article demonstrated how to set up an Express server, manage the routes, create the models and controllers, and use a persistent database MongoDB to build a CRUD API. By this point, I hope you are able to create a CRUD API from scratch and implement it in your projects.
Was this article helpful in that regard?
Let us know your thoughts with a reply on our Twitter.