
In this tutorial, you will learn how to create a Solana “program”, which is in other words the way smart contracts are called in Solana. Solana programs are written using low-level programming languages. More specifically, you can write Solana programs using Rust or C and C++ programming language. For this tutorial, we are going to use Rust.
Solana has emerged as an attractive alternative to Ethereum due to the cost per transaction being cheaper and faster. While the focus of this article is not to mention the differences between using Solana and Ethereum, it is a good idea to have a general understanding of why Solana is gaining popularity quickly.
Table of Contents
What kind of Solana program are we building?
We are going to build Solana program that writes a tweet, and users are able to like the tweet.
Do I need to know Rust?
While having previous knowledge in Rust will help you to focus on learning more about the concepts of a Solana program, it is not necessary to know Rust. However, having previous knowledge of a programming language is strongly recommended. We will do our best to break down step-by-step what some of the Rust syntaxes mean.
Setup Solana Development Environment
We are going to use Anchor, a framework for Solana which is in active development at the moment of this writing. The main purpose of Anchor is to provide convenient tools for developers to write Solana programs instead of spending time working on the tedious parts of the raw Solana programs.
Important Note: Currently, only x86_64 Linux is supported currently in Anchor. Therefore, your OS needs to run on x86_64. For Windows users, you can install WSL (Windows Subsystem for Linux) and follow the instructions to set up the Solana development environment.
Setting up WSL and Node in WSL (Only for Windows users)
Feel free to skip to the step to “Installing Packages For Solana Development Environment” if you are using a machine that runs on x86_64 Linux.
Open the terminal and install WSL.
wsl --installOnce the installation is complete, restart your computer. Do not proceed to the next step until you restart your computer.
After your computer has restarted, open the “Windows Features” and ensure the following options are checked:
- Windows Subsystem for Linux
- Virtual Machine Platform

If you just checked these two options, you will have to restart your computer again.
If these two configurations are were previously checked, you are good to use the Ubuntu terminal in Windows without the need to restart your computer.
Open the search menu, and type “Ubuntu. You should see an

Once you find it, click on it to open the Ubuntu terminal.
Note: If you run into issues when attempting to open Ubuntu terminal, check if Virtualization is enabled in your machine. Check out this article to learn how to enable virtualization if you are not familiar with this process.
Time to install curl, node and nvm (node version manager) in Ubuntu.
// 1. install curl
sudo apt-get install curl

// 2. install nvm
curl -o- https://raw.githubusercontent.com/nvm-sh/nvm/v0.38.0/install.sh | bash
Prior to installing node using nvm, we are going to verify nvm was installed correctly. To do so, restart the Ubuntu terminal.
In the new ubuntu terminal run the following command to verify nvm.
command -v nvmIf the output from running the previous command returns “nvm”, this means it was correctly installed.
Now, install node using nvm.
nvm install --ltsNow, you are good to go.
Follow the rest of the tutorial using WSL (Ubuntu terminal).
Note: Remember, from now on you are going to access the Linux subsystem available in your Windows machine. Hence, everything in your Windows machine will not be accessible in your Linux subsystem.
Installing Packages For Solana Development Environment
Time to set up the Solana development environment. We are going to install the following:
- Rust
- Solana
- Yarn
- Anchor
Installing Rust
Start with installing Rust using the terminal.
curl --proto '=https' --tlsv1.2 -sSf https://sh.rustup.rs | shVerify Rust was installed correctly as well as the rust compiler.
rustup --version
rustc --version
It should have installed also Cargo, which is Rust package manager. To verify Cargo was installed, run the following command.
cargo --versionNote: If you run into any issues, I recommend checking this Rust installation guide.
Installing Solana
To install Solana, I recommend checking Solana’s official installation guide to install it. Essentially, you should run the following command.
sh -c "$(curl -sSfL https://release.solana.com/stable/install)"Once the installation is complete, verify it was successfully installed.
solana --versionInstalling Anchor
If you are using a Linux system or WSL (Linux subsystem), you will need to add additional dependencies:
sudo apt-get update && sudo apt-get upgrade && sudo apt-get install -y pkg-config build-essential libudev-devOnce the dependencies are installed, use Cargo to install Anchor’s CLI.
cargo install --git https://github.com/project-serum/anchor --tag v0.24.1 anchor-cli --lockedFinally, verify Anchor’s CLI is installed correctly.
anchor --versionGenerate Paper Wallet
For us to test our Solana program, we need to have a crypto wallet. A crypto wallet stores collections of keys used to send and receive cryptocurrencies. For this tutorial, we are going to use a paper wallet generated using the command line.
To generate a paper wallet, we will use solana-keygen , which should have been installed when we installed solana. However, to verify it was correctly installed, run the following command:
solana-keygen --versionIf you see the version of solana-keygen, that means we can start using it. Run the following command to generate a keypair.
solana-keygen newThis will generate a random seed phrase and prompt you to add an optional passphrase. Feel free to add a passphrase if you want, it is ok not to for the purposes of this tutorial.
Once you fill out the information, the terminal should display the public key and a generated seed phrase. Copy and save the seed phrase in a safe place.
The key pair will be generated in the following location:
/home/<your user>/.config/solana/id.json
Running the localnet Cluster
To run our Solana program, we need to be in a cluster. According to the Solana documentation, a Solana cluster is a set of validators working together to serve client transactions and maintain the integrity of the ledger.
In other words, the Solana program cannot run if it is not in a cluster. Currently, Solana has the following clusters:
- devnet
- testnet
- mainnet
It is possible to connect to localnet, which is the cluster run in our local machine in localhost. To connect to localnet, we will use Solana CLI.
solana config set --url localhostNow, verify you connected to localnet.
solana config getThe terminal should display the RPC URL, the Websocket URL, and the keypair path.

By default, it will connect to port 8899 for RPC and port 8900 for Websocket.
Starting a Project with Anchor Framework
Use Anchor’s CLI to start a new project. The following command is the syntax to initialize a new project:
anchor init <new-project-name>We are going to give the name of “mySolanaProgram”.
anchor init mySolanaProgramThis will create a new folder with the name of the project. If you open the folder, you will see a project with the following folder structure.

Working on the Solana Program
Notice there is a lib.rs file that lives in the programs/mySolanaProgram/src folder. In there, it lives the Solana program, or smart contract. Notice the file extension finishes in rs which means it is a Rust file.
Open the lib.rs file using your favorite IDE. You should see a code similar to the following snippet.
use anchor_lang::prelude::*;

declare_id!("Fg6PaFpoGXkYsidMpWTK6W2BeZ7FEfcYkg476zPFsLnS");

#[program]
pub mod my_solana_program {
    use super::*;
    pub fn initialize(ctx: Context<Initialize>) -> Result<()> {
        Ok(())
    }
}

#[derive(Accounts)]
pub struct Initialize {}
If you don’t have previous knowledge of Rust, this won’t make sense at all. The first line of code is a way to import dependencies or libraries in Rust. In this case, it is importing the anchor library.
use anchor_lang::prelude::*;The declareId is where Solana stores the address or program id of your program. By default, Anchor generates a program id for us.
declare_id!("Fg6PaFpoGXkYsidMpWTK6W2BeZ7FEfcYkg476zPFsLnS");Then, you will see a #[program] section. This is the program module and is where the logic of the program lives.
#[program]
pub mod my_solana_program {
    use super::*;
    pub fn initialize(ctx: Context<Initialize>) -> Result<()> {
        Ok(())
    }
}
Finally, there is a #[derive(Acccounts)] section. This is where the Accounts struct lives which is where accounts are validated.
#[derive(Accounts)]
pub struct Initialize {}
You might be wondering what a struct is. A struct defines a group of properties. In other words, structs define the structure of the data. It’s like defining an interface in TypeScript if you have a background in TypeScript.
interface Initialize {
}
While it is tempting to relate structs as classes or objects, these concepts do not exist in Rust. For example, it is not possible to define methods in structs like you would using another programming language. However, it is possible to define functions to access structs.
You will see the methods manipulating the data are available in the module pub mod my_solana_program. This means, our program will have to pass data by reference from the outside in order to modify it.
This is one of the main differences between Solana and Ethereum, as Solana’s goal is to separate code and data. This means the logic could be applied to other pieces of data. That’s why Solana programs are considered stateless contracts.
Updating the Solana Program
Update the logic of the program using the following code. I recommend giving it a look and trying to understand what is going on, even if you don’t have previous knowledge of Rust.
#[program]
pub mod my_solana_program {
    use super::*;
    pub fn setup_platform(ctx: Context<TweetPlatform>) -> Result<()> {
        let tweet = &mut ctx.accounts.tweet;
        tweet.likes = 0;
        tweet.message = ("").to_string();
        Ok(())
    }

    pub fn write_tweet(
        ctx: Context<WriteTweet>,
        message: String,
        user_public_key: Pubkey
    ) -> Result<()> {
        let tweet = &mut ctx.accounts.tweet;

        if !tweet.message.trim().is_empty() {
            return err!(ErrorCode::CannotUpdateTweet);
        }

        if message.trim().is_empty() {
            return err!(ErrorCode::EmtpyMessage);
        }

        tweet.message = message;
        tweet.likes = 0;
        tweet.creator = user_public_key;

        Ok(())
    }

    pub fn like_tweet(ctx: Context<LikeTweet>, user_liking_tweet: Pubkey) -> Result<()> {
        let tweet = &mut ctx.accounts.tweet;

        if tweet.message.trim().is_empty() {
            return err!(ErrorCode::NotValidTweet);
        }

        if tweet.likes == 5 {
            return err!(ErrorCode::ReachedMaxLikes);
        }

        let mut iter = tweet.people_who_liked.iter();
        if iter.any(|&v| v == user_liking_tweet) {
            return err!(ErrorCode::UserLikedTweet);
        }

        tweet.likes += 1;
        tweet.people_who_liked.push(user_liking_tweet);

        Ok(())
    }
}

#[derive(Accounts)]
pub struct TweetPlatform<'info> {
    #[account(init, payer = user, space = 9000 )]
    pub tweet: Account<'info, Tweet>,
    #[account(mut)]
    pub user: Signer<'info>,
    pub system_program: Program<'info, System>,
}

#[derive(Accounts)]
pub struct WriteTweet<'info> {
    #[account(mut)]
    pub tweet: Account<'info, Tweet>,
}

#[derive(Accounts)]
pub struct LikeTweet<'info> {
    #[account(mut)]
    pub tweet: Account<'info, Tweet>
}

#[account] //An attribute for a data structure representing a Solana account.
#[derive(Default)]
pub struct Tweet {
    message: String,
    likes: u8,
    creator: Pubkey,
    people_who_liked: Vec<Pubkey>, // with  #[derive(Default)] we can assign default values
}


#[error_code]
pub enum Errors {
    #[msg("Tweet message cannot be updated")]
    CannotUpdateTweet,

    #[msg("Message cannot be empty")]
    EmtpyMessage,

    #[msg("Cannot receive more than 5 likes")]
    ReachedMaxLikes,

    #[msg("Cannot like a tweet without a valid message")]
    NotValidTweet,

    #[msg("User has already liked the tweet")]
    UserLikedTweet,
}
Understanding the Logic
Note: By no means I’m an expert. However, I will do my best to explain my understanding of how Solana and the Anchor framework works.
What does the program do?
The main purpose of this Solana program is for a user to write a tweet. The requirements for this program are:
- Only one person can write a tweet
- The tweet’s message cannot be empty
- The tweet can be liked by up to 5 different users
- A user cannot like a tweet more than once
These requirements are pretty standard.
Defining the program errors
Let’s start with the bottom of the code. It is an enum of Errors, and it is used to define each of the errors.
#[error_code]
pub enum Errors {
    #[msg("Tweet message cannot be updated")]
    CannotUpdateTweet,

    #[msg("Message cannot be empty")]
    EmtpyMessage,

    #[msg("Cannot receive more than 5 likes")]
    ReachedMaxLikes,

    #[msg("Cannot like a tweet without a valid message")]
    NotValidTweet,

    #[msg("User has already liked the tweet")]
    UserLikedTweet,
}
Notice the attribute #[error_code] above the enum Errors. This attribute is provided by anchor_lang library, which is imported at the top of the file.
#[error_code]
pub enum Errors {
    #[msg("Tweet message cannot be updated")]
    CannotUpdateTweet
}
Notice how there is a #[msg()] attribute right above each enum error. This allows us to define a user-friendly error message.
In the following snippet of code, we show you how to throw one of the enum Errors by using the Err which represents a result type containing a value, value we provide using into(). For instance, we return the error CannotUpdateTweet using the following syntax return err!(ErrorCode::CannotUpdateTweet); if the message of the tweet is not empty.
pub fn write_tweet(
        ctx: Context<WriteTweet>,
        message: String,
        user_public_key: Pubkey
    ) -> ProgramResult {
        // some logic

        if !tweet.message.trim().is_empty() {
            return err!(ErrorCode::CannotUpdateTweet);
        }

        // more logic
    }
Defining the Structures
Let’s move on to defining the structs, or the structures of data.
#[derive(Accounts)]
pub struct TweetPlatform<'info> {
    #[account(init, payer = user, space = 9000 )]
    pub tweet: Account<'info, Tweet>,
    #[account(mut)]
    pub user: Signer<'info>,
    pub system_program: Program<'info, System>,
}

#[derive(Accounts)]
pub struct WriteTweet<'info> {
    #[account(mut)]
    pub tweet: Account<'info, Tweet>,
}

#[derive(Accounts)]
pub struct LikeTweet<'info> {
    #[account(mut)]
    pub tweet: Account<'info, Tweet>
}

#[account]
#[derive(Default)]
pub struct Tweet {
    message: String,
    likes: u8,
    creator: Pubkey,
    people_who_liked: Vec<Pubkey>
}
Let’s start with the struct where the main logic of the program is based on, the Tweet struct.
#[account]
#[derive(Default)]
pub struct Tweet {
    message: String,
    likes: u8,
    creator: Pubkey,
    people_who_liked: Vec<Pubkey>
}
It is incorrect to call message, likes, creator, and people_who_liked “properties”. However, you can think of them in that way to relate if you are coming from object-oriented programming. In theory, we are only defining the names and types of the pieces of data.
The String type is itself a string, but the other types you might not be familiar with.
u8is an unsigned integer type.Pubkeyis a public key type of a solana account.Vec<>is a growable array type. Hence,Vec<Pubkey>is a growable array type of public key types.
There is the #[account] attribute and it defines the data structure of a Solana account. One of the main characteristics of this attribute is to generate implementations to serialize and deserialize an account. According to the docs, when implementing account serialization traits the first 8 bytes are reserved for a unique account discriminator, self-described by the first 8 bytes of the SHA256 of the account’s Rust ident.AccountSerialize.
Finally, there is #[derive(Default)], and it allows defining default values for the pieces of data whenever the struc is generated. Currently, we are not setting default data.
Let’s move on to the TweetPlatform structure, which contains the tweet, user and system_program pieces of data.
#[derive(Accounts)]
pub struct TweetPlatform<'info> {
    #[account(init, payer = user, space = 9000 )]
    pub tweet: Account<'info, Tweet>,
    #[account(mut)]
    pub user: Signer<'info>,
    pub system_program: Program<'info, System>,
}
Pay attention to the use of the derive attribute #[derive(Accounts)]. This allows deserializing the Solana accounts so they can be validated and prevent account substitution attacks. A derive attribute allows new items to be automatically generated for data structures.
   #[account(init, payer = user, space = 9000 )]
    pub tweet: Account<'info, Tweet>
Notice the use of init attribute for the tweet field. In other words, this will create a new account owned by the current program. Using init requires someone to pay for creating the account.
   #[account(init, payer = user, space = 9000 )]
    pub tweet: Account<'info, Tweet>,
    #[account(mut)]
    pub user: Signer<'info>,
In this case, the user field is defined as the account that will provide the funds to create the tweet account. Finally, there is the space attribute. This defines how large the tweet account should be. For the purposes of this tutorial, we assigned 9000, but this should be calculated beforehand to know how much space it will occupy the program.
When using the init attribute, we must provide the system_program . This is required by the runtime to create the account.
pub system_program: Program<'info, System>,Finally, we have the WriteTweet and LikeTweet structs.
#[derive(Accounts)]
pub struct WriteTweet<'info> {
    #[account(mut)]
    pub tweet: Account<'info, Tweet>,
}

#[derive(Accounts)]
pub struct LikeTweet<'info> {
    #[account(mut)]
    pub tweet: Account<'info, Tweet>
}
These structs have the tweet account defined with the attribute #[account(mut)]. The mut flag allows keeping changes made to the account even after exiting the program.
Hence, there are two flags you must take into consideration. The init and the mut flags. The first is used when the account (tweet) is used for the first time and the mut is used to persist any changes, for instance, writing a value to message or updating the likes field.
Defining instructions in the module
It’s time to talk about the methods defined in the module. These are called instructions. Based on Solana documentation, an instruction specifies a single program, a subset of the transaction’s accounts that should be passed to the program, and a data byte array that is passed to the program. The program interprets the data array and operates on the accounts specified by the instructions.
#[program]
pub mod my_solana_program {
    use super::*;
    pub fn setup_platform(ctx: Context<TweetPlatform>) -> Result<()> {
        let tweet = &mut ctx.accounts.tweet;
        tweet.likes = 0;
        tweet.message = ("").to_string();
        Ok(())
    }

    pub fn write_tweet(
        ctx: Context<WriteTweet>,
        message: String,
        user_public_key: Pubkey
    ) ->Result<()> {
        let tweet = &mut ctx.accounts.tweet;

        if !tweet.message.trim().is_empty() {
            return err!(ErrorCode::CannotUpdateTweet);
        }

        if message.trim().is_empty() {
            return err!(ErrorCode::EmtpyMessage);
        }

        tweet.message = message;
        tweet.likes = 0;
        tweet.creator = user_public_key;

        Ok(())
    }

    pub fn like_tweet(ctx: Context<LikeTweet>, user_liking_tweet: Pubkey) -> Result<()> {
        let tweet = &mut ctx.accounts.tweet;

        if tweet.message.trim().is_empty() {
            return err!(ErrorCode::NotValidTweet);
        }

        if tweet.likes == 5 {
            return err!(ErrorCode::ReachedMaxLikes);
        }

        let mut iter = tweet.people_who_liked.iter();
        if iter.any(|&v| v == user_liking_tweet) {
            return err!(ErrorCode::UserLikedTweet);
        }

        tweet.likes += 1;
        tweet.people_who_liked.push(user_liking_tweet);

        Ok(())
    }
}
Let’s start with the setup_platform method.
pub fn setup_platform(ctx: Context<TweetPlatform>) -> Result<()> {
        let tweet = &mut ctx.accounts.tweet;
        tweet.likes = 0;
        tweet.message = ("").to_string();
        Ok(())
    }
The first thing to notice is the usage of a ctx parameter via Context<>. The Context<> deserializes the accounts found in the struct type passed, in this case, the TweetPlatform. That’s why you can access the field tweet when using ctx.accounts.
There are other data fields you can access via ctx parameter
program_id: The current executing program id.remaining_accounts: Other accounts given but not deserialized or validated.
Which we are not using, but it is important to know about in case we need access to other data fields of a struct.
Also, we use the keyword &mut to get the mutable reference of the tweet data field. Remember, Solana programs are considered stateless contracts. This means there are no variables and data must be passed from the outside if we want to modify it.
let tweet = &mut ctx.accounts.tweet;While the setup_platform instruction doesn’t seem to do much besides setting the likes data to 0 and the message to an empty string, it is important to remember this process must happen as the TweetPlatform struc uses the init attribute to create tweet account.
Now, let’s look a the write_tweet instruction.
pub fn write_tweet(
        ctx: Context<WriteTweet>,
        message: String,
        user_public_key: Pubkey
    ) -> Result<()> {
        let tweet = &mut ctx.accounts.tweet;

        if !tweet.message.trim().is_empty() {
            return err!(ErrorCode::CannotUpdateTweet);
        }

        if message.trim().is_empty() {
            return err!(ErrorCode::EmtpyMessage);
        }

        tweet.message = message;
        tweet.likes = 0;
        tweet.creator = user_public_key;

        Ok(())
    }
There are two new things happening in this instruction.
One of them is for the Solana program to accept incoming data used to modify an account (tweet). Besides accepting the context ctx: Context<WriteTweet>, which we used to deserialize and access tweet account,
- A user can pass a
message. - A user can pass their
user_public_keyto “write” a new tweet and identify the creator or owner of the tweet.
The second new part is to apply restrictions to the tweet account.
- Cannot overwrite a
tweet.messageif thetweet.messagehas already data. - Cannot write an empty
tweet.messageif themessageprovided by the external user is empty.
This allows us to use our custom program errors in case any of these fails.
If you paid close attention, we used the WriteTweet struct which uses the mut attribute on the tweet account. Remember, this attribute marks the account as mutable and persists changes. That’s why, if we access the tweet account in a different instruction such as like_tweet, we can add additional check to verify the tweet.message is not empty, which infers the tweet.message should have been previously updated in the write_tweet instruction.
Finally, we have the like_tweet instruction.
pub fn like_tweet(ctx: Context<LikeTweet>, user_liking_tweet: Pubkey) -> Result<()> {
        let tweet = &mut ctx.accounts.tweet;

        if tweet.message.trim().is_empty() {
             return err!(ErrorCode::NotValidTweet);
        }

        if tweet.likes == 5 {
            return err!(ErrorCode::ReachedMaxLikes);
        }

        let mut iter = tweet.people_who_liked.iter();
        if iter.any(|&v| v == user_liking_tweet) {
            return err!(ErrorCode::UserLikedTweet);
        }

        tweet.likes += 1;
        tweet.people_who_liked.push(user_liking_tweet);

        Ok(())
    }
Hopefully, this won’t require much explanation as most of the concepts were explained when we covered the other two instructions, setup_platform and write_tweet. Probably, the only part it might be new for those without much Rust experience is the way we are checking if a new user has liked a tweet before or not.
        let mut iter = tweet.people_who_liked.iter();
        if iter.any(|&v| v == user_liking_tweet) {
            return Err(Errors::UserLikedTweet.into());
        }


        tweet.people_who_liked.push(user_liking_tweet);
In short, we need to iterate through all of the values from the people_who_liked data field to verify if the user liking the tweet (user_liking_tweet) has liked it before. Otherwise, add the user_liking_tweet to the array.
Build the program
After you added all the program logic in the lib.rs file, go ahead and build the program using the following command.
anchor buildTesting the program
If you haven’t written many programmatic tests in the past, you will find writing tests more often than what you have ever done in your career when working in web3.
When we created this project using the Anchor framework, it generated a tests/mySolanaProgram.ts file.
Update the mySolanaProgram.ts file with the following tests.
import * as anchor from '@project-serum/anchor';
import { Program } from '@project-serum/anchor';
import { MySolanaProgram } from '../target/types/my_solana_program';
import { expect, assert } from 'chai';

describe('mySolanaProgram', () => {

  // Configure the client to use the local cluster.
  anchor.setProvider(anchor.AnchorProvider.local());

  const program = anchor.workspace.MySolanaProgram as Program<MySolanaProgram>;
  it('setup tweet platform!', async () => {
    const tweetKeypair = anchor.web3.Keypair.generate();
    const user = program.provider.wallet;
    await program.rpc.setupPlatform({
      accounts: {
        tweet: tweetKeypair.publicKey,
        user: user.publicKey,
        systemProgram: anchor.web3.SystemProgram.programId
      },
      signers: [tweetKeypair]
    });

    let tweet = await program.account.tweet.fetch(tweetKeypair.publicKey);
    expect(tweet.likes).to.equal(0);
    expect(tweet.message).to.equal('');
  });

  it('Write a tweet', async () => {
    const tweetKeypair = anchor.web3.Keypair.generate();
    const user = program.provider.wallet;
    await program.rpc.setupPlatform({
      accounts: {
        tweet: tweetKeypair.publicKey,
        user: user.publicKey,
        systemProgram: anchor.web3.SystemProgram.programId
      },
      signers: [tweetKeypair]
    });

    let tweet = await program.account.tweet.fetch(tweetKeypair.publicKey);
    expect(tweet.likes).to.equal(0);
    expect(tweet.message).to.equal('');

    await program.rpc.writeTweet('Hello World!', user.publicKey, {
      accounts: {
        tweet: tweetKeypair.publicKey,
      },
      signers: []
    });

    tweet = await program.account.tweet.fetch(tweetKeypair.publicKey);

    expect(tweet.likes).to.equal(0);
    expect(tweet.message).to.equal('Hello World!');
    expect(tweet.creator.toString()).to.equal(user.publicKey.toString());
  });

  it('should like tweet up no more than 5 times', async () => {
    const tweetKeypair = anchor.web3.Keypair.generate();
    const user = program.provider.wallet;
    await program.rpc.setupPlatform({
      accounts: {
        tweet: tweetKeypair.publicKey,
        user: user.publicKey,
        systemProgram: anchor.web3.SystemProgram.programId
      },
      signers: [tweetKeypair]
    });

    let tweet = await program.account.tweet.fetch(tweetKeypair.publicKey);
    expect(tweet.likes).to.equal(0);
    expect(tweet.message).to.equal('');

    await program.rpc.writeTweet('Hello World!', user.publicKey, {
      accounts: {
        tweet: tweetKeypair.publicKey,
      },
      signers: []
    });

    tweet = await program.account.tweet.fetch(tweetKeypair.publicKey);
    expect(tweet.likes).to.equal(0);
    expect(tweet.message).to.equal('Hello World!');
    expect(tweet.creator.toString()).to.equal(user.publicKey.toString());

    await program.rpc.likeTweet(user.publicKey, {
      accounts: {
        tweet: tweetKeypair.publicKey,
      },
      signers: []
    });

    tweet = await program.account.tweet.fetch(tweetKeypair.publicKey);
    expect(tweet.likes).to.equal(1);
    expect(tweet.peopleWhoLiked[0].toString()).to.equal(user.publicKey.toString());

    try {
      await program.rpc.likeTweet(user.publicKey, {
        accounts: {
          tweet: tweetKeypair.publicKey,
        },
        signers: []
      });

      assert.ok(false);
    } catch (error) {
      const expectedError = 'User has already liked the tweet';
      assert.equal(error.error.errorMessage, expectedError);
    }


    const secondUser = anchor.web3.Keypair.generate();
    await program.rpc.likeTweet(secondUser.publicKey, {
      accounts: {
        tweet: tweetKeypair.publicKey,
      },
      signers: []
    });

    tweet = await program.account.tweet.fetch(tweetKeypair.publicKey);
    expect(tweet.likes).to.equal(2);
    expect(tweet.peopleWhoLiked[1].toString()).to.equal(secondUser.publicKey.toString());


    const thirdUser = anchor.web3.Keypair.generate();
    await program.rpc.likeTweet(thirdUser.publicKey, {
      accounts: {
        tweet: tweetKeypair.publicKey,
      },
      signers: []
    });

    tweet = await program.account.tweet.fetch(tweetKeypair.publicKey);
    expect(tweet.likes).to.equal(3);
    expect(tweet.peopleWhoLiked[2].toString()).to.equal(thirdUser.publicKey.toString());


    const fourthUser = anchor.web3.Keypair.generate();
    await program.rpc.likeTweet(fourthUser.publicKey, {
      accounts: {
        tweet: tweetKeypair.publicKey,
      },
      signers: []
    });

    tweet = await program.account.tweet.fetch(tweetKeypair.publicKey);
    expect(tweet.likes).to.equal(4);
    expect(tweet.peopleWhoLiked[3].toString()).to.equal(fourthUser.publicKey.toString());


    const fifthUser = anchor.web3.Keypair.generate();
    await program.rpc.likeTweet(fifthUser.publicKey, {
      accounts: {
        tweet: tweetKeypair.publicKey,
      },
      signers: []
    });

    tweet = await program.account.tweet.fetch(tweetKeypair.publicKey);
    expect(tweet.likes).to.equal(5);
    expect(tweet.peopleWhoLiked[4].toString()).to.equal(fifthUser.publicKey.toString());


    const sixthUser = anchor.web3.Keypair.generate();
    try {


      await program.rpc.likeTweet(sixthUser.publicKey, {
        accounts: {
          tweet: tweetKeypair.publicKey,
        },
        signers: []
      });

      assert.ok(false);
    } catch (error) {
      assert.equal(error.error.errorMessage, 'Cannot receive more than 5 likes');
    }
  });

  it('should not allow writting an empty message', async () => {
    const tweetKeypair = anchor.web3.Keypair.generate();
    const user = program.provider.wallet;
    await program.rpc.setupPlatform({
      accounts: {
        tweet: tweetKeypair.publicKey,
        user: user.publicKey,
        systemProgram: anchor.web3.SystemProgram.programId
      },
      signers: [tweetKeypair]
    });

    let tweet = await program.account.tweet.fetch(tweetKeypair.publicKey);
    expect(tweet.likes).to.equal(0);
    expect(tweet.message).to.equal('');


    try {
      await program.rpc.writeTweet('', user.publicKey, {
        accounts: {
          tweet: tweetKeypair.publicKey,
        },
        signers: []
      });
      assert.ok(false);
    } catch (error) {
      assert.equal(error.error.errorMessage, 'Message cannot be empty');
    }
  });
});
What you will find interesting is how programmatic tests are written in a different programming language (Typescript, but you could configure it also to use JavaScript), and the Solana program uses Rust.
The Anchor workflow recommends to test your program using integration tests in a language other than Rust to make sure that bugs related to syntax misunderstandings are coverable with tests and not just replicated in tests.
Anchor documentation
When you built the Solana program in the previous step, it generates an IDL located in the target/idl folder. The IDL is an interface definition language that lets a program written in one language communicate with another program written in an unknown language.
Hence, we can access the instructions we defined in my_solana_program in TypeScript so we can validate they are properly working.
By default, anchor added mocha and chai, JavaScript testing libraries which you can find in the devDependencies of the package.json.
We won’t go into details explaining how these libraries work. However, there are a few things to take into account which we will explain below.
Configuring to use a specific cluster
Solana programs are run in clusters. As previously mentioned, the clusters available are devnet, testnet, mainnet, and localnet which is the local cluster. The following line of code is Anchor helping us configure the client to use a specific cluster.
// Configure the client to use the local cluster.
  anchor.setProvider(anchor.AnchorProvider.local());
Currently, the comments said that // Configure the client to use the local cluster. What is truly getting the local cluster is this line of code.
anchor.AnchorProvider.local()In other words, that checks the Anchor.toml file and checks the cluster set up in [provider] section. By default, it should have been set to “localnet”. Hence, if you decide to update it to another cluster, it will configure that cluster at the moment of executing the tests.
Accessing the Solana program and executing instructions
Anchor does a lot of the heavy lifting for us to access the Solana program by using the program variable.
const program = anchor.workspace.MySolanaProgram as Program<MySolanaProgram>;Anchor provides workspace as a way to access all Solana programs in the local project.
Anchor also has a helper function to generate key pairs to execute the tests. Remember, these key pairs represent a wallet which are accounts we validate in the Solana program.
const tweetKeypair = anchor.web3.Keypair.generate();Finally, notice how we are triggering the instructions or methods of the Solana program via the rpc property
await program.rpc.setupPlatform({
      accounts: {
        tweet: tweetKeypair.publicKey,
        user: user.publicKey,
        systemProgram: anchor.web3.SystemProgram.programId
      },
      signers: [tweetKeypair]
    });
Notice how Anchor updated the naming convention of the methods from one programming language to another. In Rust, it is called setup_platform and in JavaScript it is called setupPlatform.
Finally, notice how we access the data from the program via program.account.
await program.account.tweet.fetch(tweetKeypair.publicKey);In this case, we access the tweet account, and trigger the fetch method using the public key for the tweet account to access deserialized data, which we use to run tests validations.
let tweet = await program.account.tweet.fetch(tweetKeypair.publicKey);
expect(tweet.likes).to.equal(0);
expect(tweet.message).to.equal('');
Running the tests
To run the tests, execute the following command.
anchor testThis will build, deploy, and test programs against a specific cluster.
Deploying the program
For this tutorial, we will deploy the Solana program to devnet. To do so, we must do the following.
Configure devnet cluster
solana config set --url devnetMake sure you are on the devnet cluster
solana config getBuild the program
anchor buildGenerate a new program id
By default, Anchor generated a program id for local development. We need to generate a program id before we deploy to devnet.
solana address -k target/deploy/my_solana_program-keypair.jsonCopy the program id and save it. We will use it in the next step.
Update program id in Anchor.toml and lib.rs
Now that you have the program id, open the Anchor.toml file and do the following:
- Update
[programs.localnet]to[programs.devnet]. - Update the program id set in
my_solana_programwith the new program id. - Update the cluster to
cluster = "devnet".
Open the lib.rs file and update the program id used in the declar_id! function.
declare_id!(<MY_NEW_PROGRAM_ID>);Build the program one more time
anchor buildDeploy to devnet
Finally, we are ready to deploy.
anchor deployVerify Solana Explorer
Open Solana Explorer devnet and verify it was successfully deployed by providing the program id.
NOTE: Make sure to select “devnet” in the top right corner once you are in the Solana Explorer,
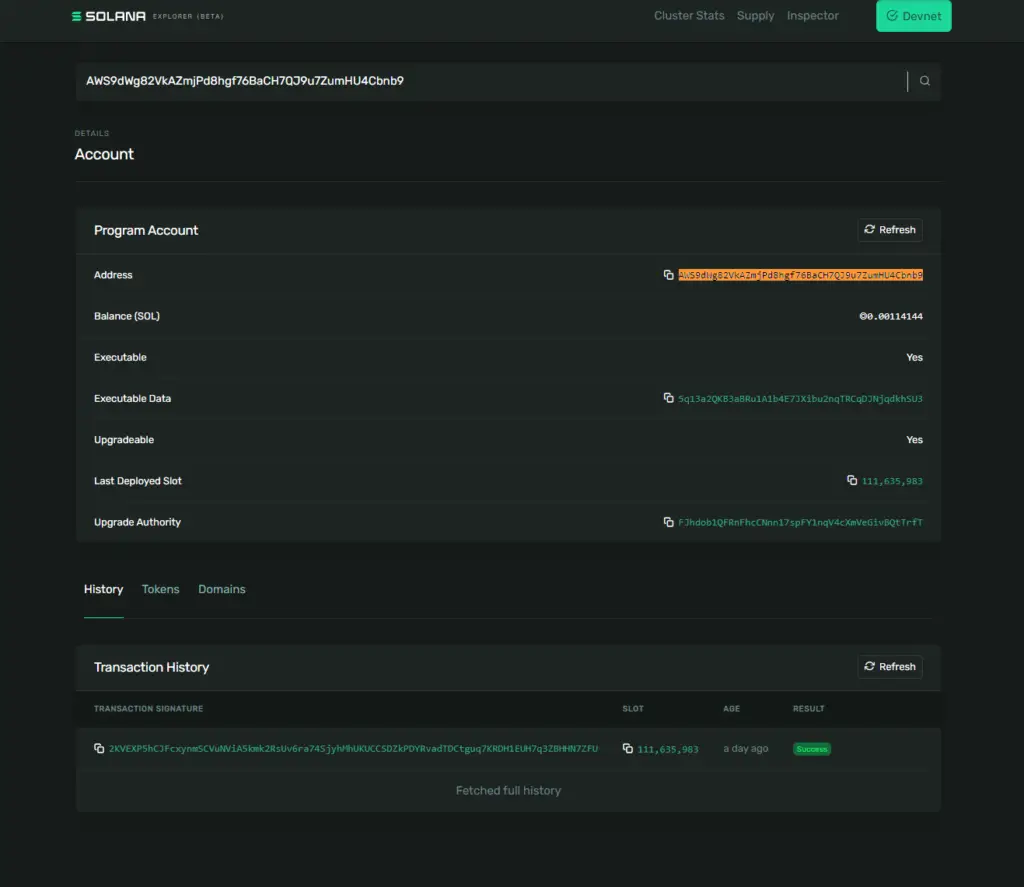
Check out the transaction history section. You should only have one transaction. This should tell you when it was deployed.
Conclusion
This was an extensive tutorial and I hope you were able to create your Solana program using the Anchor framework. We covered several topics and even learned a new programming language like Rust, for those without previous experience in Rust. We learned how to use Anchor CLI to build, deploy and execute tests, and wrote tests cases to make sure our Solana program worked as expected.
I encourage you to make changes to the project and further develop this Solana program if you wish to. By no means do I consider myself an expert. However, I did my best effort to explain the concepts after a lot of research to break them into more digestible content.
Was this tutorial helpful?
Hopefully, it was not only informative to build the Solana smart contract, but also helpful as I understand how complex and confusing this can turn with too many new concepts going on.
If it was, share it with your friends and colleagues interested in the world of Web3 development.
I recommend you to check out How to Connect a Web3 React App to Phantom using TypeScript if you are interested in learning how to connect to a Phantom wallet using React, which could give you the option to connect to any Solana program, even the Solana program we deployed in devnet in this tutorial.
Share your thoughts by replying on Twitter of Become A Better Programmer or to my personal Twitter account.